- Scripting Actions in CloudForms
- Updates to Rails and Ruby
- Understanding the Automate Model
- Automate Model
- Creating a Domain
- Editing a Domain
- Deleting a Domain
- Importing a Domain from a Git Repository
- Changing Priority Order of Domains
- Creating a Namespace
- Creating a Class
- Creating a Schema for a Class
- Editing a Field in a Schema
- Editing Schema Sequence
- Adding an Instance to a Class
- Copying a Class or Instance
- Relationships
- Methods
- Expression Methods
- Simulation
- Importing, Exporting, and Resetting the Datastore
- Invoking Automate
- Automate Examples
- Invoking Automate using a Custom Button
- Creating a Custom Button Group
- Creating a Custom Button
- Creating an Ansible Playbook Button
- Editing a Custom Button
- Deleting a Custom Button
- Setting Enablement and Visibility for Custom Buttons
- Using a Custom Button
- Initiating Automate from an Event
- Creating a Policy for Automate
- Creating a Custom Automate Action
- Objects
- FAQs and Flows
- Inline Method to Create a Provision Request
- Migrating Custom Buttons
Scripting Actions in CloudForms
The Automate model provides flexibility to not only change parts of the provisioning process, but also to allow you to automate other operational tasks. Below are some scenarios where the Automate model can help accomplish these tasks.
-
Intelligent Workload Management - An enterprise had a requirement that when a virtual machine has reached a High CPU Percent Ready for a specified period of time, a vMotion should occur to a more suitable host. For this reason, VMware’s Distributed Resource Scheduler (DRS) was not practical, as the CPU Ready metric could not trigger DRS. The solution was to leverage ManageIQ Control and ManageIQ Automate to drive the management of this workflow.
-
Power on only during business hours - An organization which gave a group of self-service users ManageIQ access had a requirement to only allow certain virtual machines to be powered during business hours. This was solved with ManageIQ Automate.
-
Auto-Tagging virtual machines based on file contents - An IT organization needed a way to consume information from a text file on a virtual machine and dynamically populate vCenter. The data used to auto-tag virtual machines is also used to align unmanaged virtual machines to the business.
Updates to Rails and Ruby
Changes within Ruby and Rails versions can create issues for custom code and automation in ManageIQ environments.
Before proceeding with major upgrades that include changes to versions of Ruby and Rails, review the below resources.
Updates and Changes in Rails
See Rails Releases for information on each release of Rails. To compare versions of Rails, see Comparing changes in Rails.
Updates and Changes in Ruby
See Ruby Releases for information on each release of Ruby by version number. To compare versions of Ruby, see Comparing changes in Ruby.
Understanding the Automate Model
Automate enables real-time, bi-directional process integration. This provides users with a method to implement adaptive automation for management events and administrative or operational activities.
Automate Model
The Automate model is arranged to provide an object oriented hierarchy to control automation functions. The model uses the following organizational units arranged in a hierarchy:
-
Datastore - The main organization unit that stores the entire model.
-
Domains - Domains act as collection of automation functions. Functions are executed depending on the order of Domain priority, which means a function in a Domain with a higher priority overrides the same functions specified in a lower-priority Domain. This allows ManageIQ to specify a core Domain (ManageIQ) but allow users to override automate functions with custom Domains. Each Domain contains a set of Namespaces.
-
Namespaces - Containers that organize and categorize functions of the model. Namespaces can contain child Namespaces as well as Classes.
-
Classes - Templates for a specific function of the model. Each Class uses a Schema to apply to Instances to populate with default values. Each class also can contain a set of methods.
-
Instances - An instance is a version of a class populated with initial configuration data. An instance can include a collection of any number of attributes, calls to methods, and relationships.
-
Methods - Methods are functions within the model. Methods use Ruby code to execute various operations needed for a Class.
ManageIQ contains a set of preconfigured Domains for users:
-
ManageIQ - The core domain for ManageIQ Automate operations. This domain is locked with the following Namespaces:
-
Cloud - General cloud instance lifecycle from provisioning, retirement, methods, email.
-
Control - Control contains email alerts for policy controls.
-
Infrastructure - General infrastructure VM lifecycle from provisioning, retirement, methods, email.
-
Service - Service lifecycle from provisioning, retirement, methods, email.
-
System - System contains classes that can provide the start points for all ManageIQ Automate activities.
-
-
RedHat - Domain containing advanced operations, specifically interactions with supported cloud and infrastructure providers. This domain is locked with the following Namespaces:
-
Cloud - Red Hat-supported cloud instance lifecycle from provisioning, retirement, methods, email.
-
Infrastructure - Red Hat-supported cloud instance lifecycle from provisioning, retirement, methods, email.
-
Integration - Used to interface with systems outside of ManageIQ. Use this namespace to integrate with additional systems.
-
You can copy classes and instances from locked Domains into your own custom domains.
Note:
Changing the existing classes or instances shipped with the product is not recommended because this may hinder the operation of ManageIQ. You can link to these methods using relationships.
To reset the Automate model to default settings, navigate to menu:Automate[Import/Export] and click the Reset option.
Creating a Domain
-
Navigate to menu:Automation[Automate > Explorer]. The default view is the Datastore.
-
Click
 (Configuration), then
 (Add a New Domain).
 -
Type in a unique Name and Description. Choose if the Domain is Enabled.
-
Click Add.
The new domain is created.
Editing a Domain
-
Navigate to menu:Automation[Automate > Explorer]. The default view is the Datastore.
-
Select the Domain you want to edit.
-
Click
(Configuration), then
 (Edit Selected Domain).
 -
Make the required edits.
-
Click Save.
You have edited the selected domain.
Deleting a Domain
-
Navigate to menu:Automation[Automate > Explorer]. The default view is the Datastore.
-
Select the Domain that you want to delete.
-
Click
(Configuration), then
 (Remove This Domain).
 -
A window to confirm the removal of Domain appears.
-
Click OK.
The selected Domain is deleted.
Importing a Domain from a Git Repository
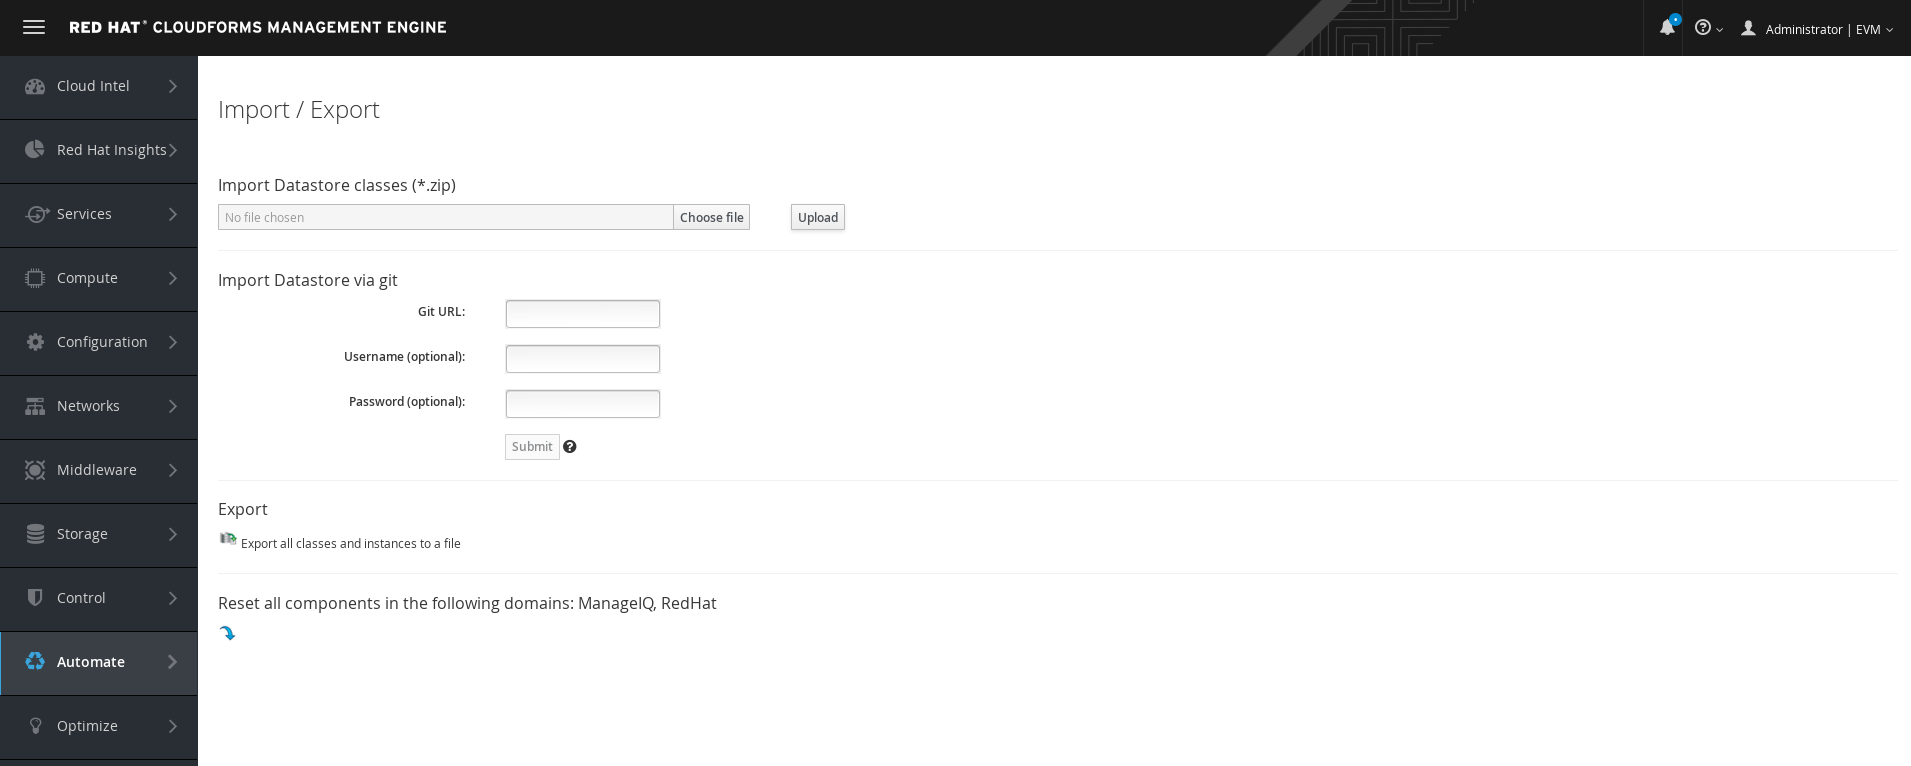
ManageIQ can import an Automate domain from a Git repository by specifying a repository and branch, along with user details. Currently, you can only add git domains via the Import/Export area of the user interface.
-
Navigate to menu:Automation[Automate > Import/Export].
-
In Import Datastore via git, enter the Git URL. Select the branch or tag to use.
-
Optionally, enter a Username and Password.
-
Select Verify Peer Certificate if desired.
-
Click Submit.
The new domain is imported via Git repository. Note that the domain is validated on import.
Changing Priority Order of Domains
Functions are executed depending on the order of Domain priority. Use this procedure to change the priority order of domains.
-
Navigate to menu:Automation[Automate > Explorer]. The default view is the Datastore.
-
Select the Domains you want to change the priority order for.
-
Click
(Configuration), then
(Edit Priority Order of Domains). -
The list of Domains selected shows up. Note that you cannot change the priority of locked Domains and therefore locked Domains do not show up on the list.
-
Select one or more consecutive groups to move up or down to change their priority as required.
-
Click Save.
Creating a Namespace
-
Navigate to menu:Automation[Automate > Explorer]. The default view is the Datastore.
-
Navigate through the various Domains and Namespaces until you reach the desired location for your new Namespace.
-
Click
(Configuration), then
(Add a New Namespace). -
Type in a unique Name and Description.
-
Click Add.
The new Namespace is created.
Creating a Class
-
Navigate to menu:Automation[Automate > Explorer], navigate to the namespace you want to add a class to.
-
Click
(Configuration), then
(Add a new Class). -
Type in a unique Name and Description.
-
If you want to use the schema from a class that has already been created, select it from the Inherits From dropdown. If the class that the new class inherits from changes, the new class will also change.
-
Click Add.
The new class is created and you can create a schema, add instances and methods.
Note:
For each class, create a schema if you did not choose to inherit from an existing class. The schema can include attributes, methods, assertions, and relationships.
Creating a Schema for a Class
This procedure shows you how to create a schema.
-
Navigate to menu:Automation[Automate > Explorer], and click the class you want to define a schema for.
-
Click on the Schema tab.
-
Click
(Configuration), then
(Edit selected Schema). -
Click
 (Click to add a new field) to
create a new field.
(Click to add a new field) to
create a new field. -
Type in a Name for the new field.
-
From Type, select Assertion, Attribute, Method, Relationship, or State.
-
If applicable, select a Data Type and set a Default Value.
-
Type in a user friendly Display Name and Description.
-
Check Sub to enable the substitution syntax of
${}. Uncheck it if you want to use that syntax as a regular string. -
Fill in Collect and Message as required. Collect is used to roll up values from resolved relationships. For example, a relationship can resolve to a large object tree. Use collect to specify how to pull out data from those child objects into the current object. If you give collect a name value, it will store the method result in an attribute of the current object with that name.
-
On Entry, On Exit, On Error, Max Retries, and Max Time are fields used mostly for state machines. Leave blank if not applicable.
-
Click
 (Add this entry) to confirm the
fields values.
(Add this entry) to confirm the
fields values. -
For each new field, repeat steps 4 through 10.
-
When you have created all of the fields, click Save.
The class schema is created, and you can now add instances to it.
Note:
You may need to edit a class schema to reorder, add, edit, or remove a field. Classes define the order in which fields are processed and you may need to process some items before others.
Editing a Field in a Schema
This procedure describes how to edit schema fields.
-
Navigate to menu:Automation[Automate > Explorer].
-
Click the class you want to define a schema for.
-
Click the Schema tab.
-
Click
(Configuration), then
(Edit selected Schema). -
Make required changes to any of the definitions for the field.
-
To remove a field, click
 (Click to
delete this field from the schema).
(Click to
delete this field from the schema). -
Click Save when you are finished editing the schema.
Once the schema is created, you can add instances and methods to the class.
Editing Schema Sequence
This procedure shows you how to change schema sequence.
-
Navigate to menu:Automation[Automate > Explorer].
-
Click the class you want to change the schema sequence for.
-
Click the Schema tab.
-
Click
(Configuration), then
(Edit Sequence). -
In the Class Schema Sequencing area, click the field you want to change the sequence for.
-
To move a field up in the order of resolving an instance, click
 (Move selected field up).
 -
To move a field down in the order of resolving an instance, click
 (Move selected field down).
-
-
Click Save when you are finished editing the sequence.
Adding an Instance to a Class
This procedure shows you how to create an instance.
-
Navigate to menu:Automation[Automate > Explorer].
-
Click the class you want to define a schema for.
-
Click the Instances tab.
-
Click
(Configuration), then
(Add a new Instance). -
In the Main Info area, type in a Name, Display Name and Description.
-
In the Fields area, type in an appropriate value for each field, leave the field blank if no value is required, or use the default value.
-
Click Add.
Copying a Class or Instance
-
Navigate to menu:Automation[Automate > Explorer]. The default view is the Datastore.
-
Navigate through the various Domains and Namespaces until you reach the desired class or instance to copy.
-
Click
(Configuration), then either
(Copy this Class) or (Copy this Instance) depending on the
object chosen. -
Choose the target Domain in the To Domain drop-down menu.
-
The object retains the same path as the From Domain and overrides the class in From Domain if the To Domain has a high priority. You can also untick the Copy to same path option to specify a new Namespace.
-
Click Add.
Relationships
Relationships are used to connect to other instances in the Automation Datastore. Relationships are formed using URI syntax. The following can also be passed through a relationship:
-
Use
#to set the message to send to the item in the relationship. -
To pass an input to the method use
?followed by the item to pass. -
If you want to use a substitution, the syntax is
$\{}with the substitution located between the brackets.
| Example | Explanation |
|---|---|
/Cloud/VM/Provisioning/Naming/Default#create |
This relationships uses the Default instance of the Naming class, which provides a means for other classes to name virtual machines. The relationship sends the create message to the class. |
/Cloud/VM/Provisioning/StateMachines/VMProvision_VM/AcquireMACAddress#$\{#ae_message} |
This relationships substitutes the message to send to the AcquireMACAddress instance of the VMProvision_VM class with the value in ae_message. |
/Cloud/VM/Retirement/Email/vm_retirement_emails?event=vm_retired |
Invokes the vm_retirement_emails instance of the Email class. Also sends the value vm_retired in the event attribute, which is used in the vm_retirement_emails method. |
/Service/Lifecycle/Retirement?service_id=$\{process#service_id} |
Invokes the Retirement instance of the Lifecycle class and send a replacement value in process#service_id to the service_id attribute. |
Methods
Methods are pieces of code associated with a class or object to perform a task. ManageIQ allows for Ruby methods or backing a method using an Ansible playbook. You can create your own methods or use relationships to link to pre-existing ones.
ManageIQ ships with a core set of Ruby gems used by the
ManageIQ Rails Application. The Ruby gems in this set are subject
to change. If you are calling gems using Automate that are no longer in
this release, you can install them by using the gem install command.
While gems can be imported into automation methods using require, it
is recommended that the authors of the automation methods clearly
document the use of gems either in the core set or a custom set. It is
the responsibility of the author of such custom automation to own the
life cycle of any gem being referenced in those methods.
The Release Notes list Ruby gems that have been added, updated, or removed in the latest version of ManageIQ.
Creating a Method
This procedure shows you how to create a method.
-
Navigate to menu:Automation[Automate > Explorer], navigate to the class where you want to create a method.
-
Click the Methods tab.
-
Click
(Configuration),
(Add a New Method). -
In the Main Info area, type in a Name and Display Name.
-
For Location, select inline. Once selected, you will be presented with a Data area in which to write or copy the script.
-
Click Validate to check the syntax.
-
Click Add.
Creating a Dynamic Content Dialog
The procedure describes the steps to create a dynamic content dialog.
-
Navigate to menu:Automation[Automate > Explorer].
-
From the accordion menu, click menu:DOMAIN[Cloud > VM > Operations > Methods].
Note:
DOMAIN must be a user-defined Domain and not the locked ManageIQ Domain. If necessary, you can copy the class from the ManageIQ domain into a custom domain.
This example uses the Cloud Namespace but can also use the Infrastructure namespace.
-
Click
(Configuration), then
(Add a new Instance). -
In the Main Info area, enter Name = dynamic_list, replacing dynamic_list with an appropriate name for the method.
-
Enter a Display Name and Description.
-
In the Fields area, enter Value = dynamic_list. Leave the other fields blank or use the default values.
-
Click Add.
-
Navigate to Methods tab.
-
In the Main Info area, enter Name = dynamic_list and populate the Data section with the example automate method below.
-
Click Add.
-
Set the automate entry point for the dialog control; use the new instance created in step four. You can create a new domain and copy the method to that domain.
#  Automate Method

dialog_field = $evm.object

# sort_by: value / description / none
dialog_field["sort_by"] = "value"

# sort_order: ascending / descending
#dialog_field["sort_order"] = "ascending"

# data_type: string / integer
dialog_field["data_type"] = "integer"

# required: true / false
# dialog_field["required"] = "true"

dialog_field["values"] = {1 => "one", 2 => "two", 10 => "ten", 50 => "fifty"}
dialog_field["default_value"] = 2
Creating a Playbook Automate Method
ManageIQ can choose an Ansible playbook from a repository and execute it as a method. Each playbook method can take additional input parameters specified by the user.
Important:
-
You must first sync your playbook repositories before using them to create a method. See Adding a Playbook Repository in Managing Providers for information on initial playbook repository set-up.
-
Using Ansible playbooks to populate dynamic dialog fields is not recommended due to delay times caused by the overhead of interaction between systems.
-
Only users with administrator privileges can run a service dialog based on a playbook automate method.
To create a playbook automate method:
-
Navigate to menu:Automation[Automate > Explorer], then click on a domain under Datastore.
-
Under a namespace, select the class for which you want to create a new method.
-
Click the Methods tab.
-
Click
(Configuration) then,
(Add a New Method). -
In the Main Info area, select Playbook from the Type dropdown menu.
-
Provide a Name and Display Name.
-
Select a playbook Repository from the list.
-
Choose a Playbook to use.
-
Select the Machine Credential the playbook will use when it runs.
-
Select the Vault Credential to use.
-
From the Cloud Type list, select a cloud provider.
-
Choose the Cloud Credential that corresponds to the selected cloud type.
-
-
Specify the Hosts on which the playbook will run. Choose Localhost or provide unique values in the Specify host values field.
-
Set the Max TTL in minutes. The Time To Live (TTL) field allows you to set the maximum execution time for the playbook to run.
-
Select when to receive Logging Output from the options in the drop-down menu.
-
Use the Escalate Privilege toggle switch to enable user privilege escalation if credentials are called for during the playbook run.
-
Choose a Verbosity value to set the debug level for playbook execution.
-
Add required Input Parameters using the fields and values available. Click the
 to add additional input parameters.
Note:
Input parameters become extra vars, with substitution enabled. This overcomes the lack of a dialog which would normally allow for the input of additional information. For more information on extra vars, see the Ansible documentation.
-
Click Add when finished.
Once created, the domain including your playbook method can be exported to appliances in your testing or production environments or imported in appliances in multiple regions.
Important:
To import a domain with a playbook method, you must have an existing Ansible playbook on the destination environment with the same name or the import will fail.
See Exporting All Datastore Classes for information.
Passing variables between successive playbook methods
Automate designers can pass variables between successive Ansible playbook methods in a state machine using ManageIQ.
To pass variables between Ansible playbook methods, use the set_stats module in your playbooks.
Example.
---
# This playbook prints a simple debug message
- name: Echo Hello, Fred and Wilma
  hosts: localhost

  tasks:
  - name: "playbook1 - testing input vars"
    set_stats:
      data:
        pb_var1a: ""
        pb_var1b: ""

  - debug: msg="Hello,  and "
For more information on the set_stats module, see the
Ansible documentation.
Expression Methods
ManageIQ additionally provides support for Expression Methods, that allow you to use advance search filters as Automate Methods, substituting the user input from Automate Objects. Expression methods have several distinct advantages, including: running directly in the worker appliance; removing the overhead of forking a DRb process to run the Automate Methods; no Ruby code required; and prebuilt for Dynamic Dialogs.
Input Parameters
Expression methods allow for substitution of user input through input parameters,
| Input Parameter | Explanation |
|---|---|
| arg | The argument used in the expression. Each argument should employ the prefix arg. Example: arg1: the first argument in the expression; arg2: the second argument in the expression; argn: the nth argument in the expression. |
Optional Input Parameters
Note:
If attributes and distinct are not specified we try to store the result in a variable called values with a hash consisting of id and name. This makes it compatible with our existing dynamic dialog result set.
| Optional Input Parameter | Explanation |
|---|---|
| attributes | A comma delimited list of attributes to select from the resultant objects. This should me marked as an Array Type in the Input Parameters field. |
| distinct | A comma delimited list of attributes which are distinct in the resultant objects.This should me marked as an Array Type in the Input Parameters field. |
| result_obj | The object where the result data should be stored. (default: current object) |
| result_attr | The name of the attribute which stores the result. (default: values) |
| result_type | The result type hash or array (default: dialog_hash which matches to our dynamic dialog hash. Valid values are ‘hash’, ‘dialog_hash’, ‘array’, ‘simple’ |
| on_empty | The method behavior when the search returns an empty list. |
| error | Abort. (default: error) |
| default | The default value in case the result is empty and you select warn. |
Creating an Expression Method
Expression methods allow you to use advance search filters as automate methods, substituting user input at runtime, and making them ideal for dynamic dialogs.
To create an expression method:
-
Navigate to menu:Automation[Automate > Explorer], then click on a domain under Datastore.
-
Under a namespace, select the class for which you want to create a new method.
-
Click the Methods tab.
-
Click
(Configuration) then,
(Add a New Method). -
In the Main Info area, select expression from the drop-down menu.
-
Provide a Name and Display Name.
-
Select an Expression Object from the drop-down menu.
-
In the Expression editor, create the expression by setting the controls and values used at runtime:
-
Using the drop-down menu, select the value to use. Based on your selection, choose or input additional values from the drop-down menus or text fields that appear.
-
In the Contains field, input a value or click User will input the value.
-
Click
to complete the expression.
-
-
Add Input Parameters for each of the user input fields required.
-
Click
to add a new parameter. -
Provide a Name, Default Value and select a Data Type for each parameter.
-
Click
to add the parameter.Note:
If User will input the value is checked, arguments for each input parameter names using the prefix “arg”.
For example, if there are 3 fields then the input parameter names should be arg1, arg2, and arg3. If there are two runtime parameters arg1 and arg2 must be defined in the input parameters. In the default value for these fields values can be substituted from other objects in the Automate Workspace.
-
-
Click Add.
Simulation
After your model is designed, use the simulate page to test it. It allows you to see the results in tree and XML view.
Simulating an Automate Model
This procedure shows you how to simulate an automate model.
-
Navigate to menu:Automation[Automate > Simulation].
-
In Object Details, select a type of object from
/System/Process/that will initiate the model. The Message should becreate. Type in the name of the Request where you are starting from.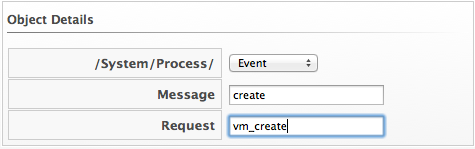
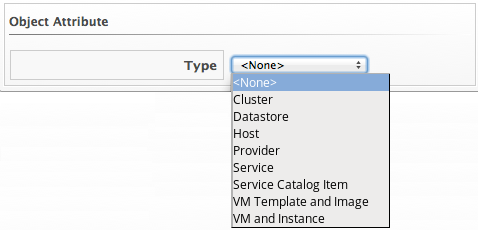
-
Select the Type of item you want to run the simulation on. Then, select a specific one to use as the example.
-
Check Execute Methods if you want to perform the model and not just simulate it.

-
Type in the Attribute/Value Pairs fields if applicable.
-
Click Submit.
Click on the Tree View or XML View tabs to see results.
Importing, Exporting, and Resetting the Datastore
The Automate Model can be exported and imported as a YAML file. ManageIQ allows you to back up your model by export. Red Hat may provide you with new or updated classes, and provides an import function for either a class or the entire model. Finally, you can reset the datastore to its default. Always be sure to export the current datastore before importing or resetting.
Note:
The datastores you are exporting or importing between must use the same ManageIQ version.
Exporting All Datastore Classes
This procedure shows you how export datastore classes as a YAML file.
-
Navigate to menu:Automation[Automate > Import/Export].
-
Click
 (Export all Datastore classes and
instances to a file).
(Export all Datastore classes and
instances to a file). -
Follow your browser’s prompts to save the file.
The datastore is zipped and exported as a YAML file.
Importing Datastore Classes
This procedure shows you how to import datastore classes.
-
Navigate to menu:Automation[Automate > Import/Export].
-
Export the datastore so that you have a backup.
-
Click Choose file to navigate to the location of the *.zip file to import.
-
Click Upload.
-
After the file has uploaded, specify the following using the dropdown menus:
-
The domain to import into
-
The domain to import from
-
All namespaces you wish to import
-
-
Click Commit to finish importing the selected domain.
The datastore is imported from the uploaded YAML files.
Resetting Datastores to the Default
This procedure shows you how reset the datastores to the default.
-
Navigate to menu:Automation[Automate > Import/Export].
-
Export the datastore so that you have a backup.
-
Click
 (Reset all components in the
following domains: RedHat, ManageIQ).
(Reset all components in the
following domains: RedHat, ManageIQ). -
Click OK.
Invoking Automate
Automate Examples
This chapter describes the ways to invoke an Automate workflow. Automation can be initiated through an alert, an event, a ManageIQ application, or a custom button. The same automation process can be re-used across more than one of these. For example, using automation to remove orphaned virtual machines and instances could be initiated by:
-
An administrator request from the ManageIQ console (from a custom button)
-
An alert indicating the datastore has less than 20% free-space
-
A virtual machine or instance unregistered event is detected
All invocations of an automate model must enter through the
/System/Process namespace.
Invoking Automate using a Custom Button
Invoke an Automate model by mapping an Ansible playbook or instance from
the /System/Process/Request class to a custom button. Before creating
the button, you need to have an Ansible playbook service catalog item or
an instance in the /System/Process/Request class to map to it and a
button group to assign it to.
Create buttons for a cluster, host, datastore, provider, virtual machines or cloud instances. When the button is clicked, the model or playbook will be invoked for the selected item. For each of these, you can have up to 15 buttons.
Creating a Custom Button Group
This procedure shows you how to create a custom button group.
-
Browse to menu: Automation > Automate > Customization.
-
Click the Buttons accordion.
-
From the Object Types tree, select the type of object you want to create the button group for.
-
Click
Configuration, Add a new Button Group. -
Type in a Button Group Text and Button Group Hover Text, and select the Button Group Image that you want to use.
-
If custom buttons have already been created, assign them to the button group. If not, see Creating a Custom Button.
-
Click Add.
The button group will show in the object type you added the button to.
Creating a Custom Button
This procedure shows you how to create a custom button.
Note:
Custom buttons can be migrated to other ManageIQ appliances. See Migrating Custom Buttons for guidance on migrating custom buttons to a new ManageIQ appliance.
-
Navigate to menu:Automation[Automate > Customization].
-
Click the Buttons accordion.
-
From the Object Types tree, select the type of object you want to create the button for.
-
Click Unassigned Buttons.
-
Click
(Configuration), then (Add a new Button).Note:
If
(Add a new Button) is not available, that means you have not created a button group for that object. To continue, create a button group first. See Creating a Custom Button. -
Under the Options tab:
-
Select the Button type from the list.
-
Enter button Text and Hover Text, and select the Icon and Icon Color to use.
-
Select a Dialog if applicable.
-
Check Open URL to open a browser window for the custom URL returned when the button is executed.
-
Choose a Display For option for the button.
-
Select a Submit parameter to choose how to submit objects to automate. Selecting Submit All will pass all objects at once when the button is executed, while choosing One by one will run execute the button action each time per object.
-
-
Under the Advanced tab:
-
Set button Enablement. Click Define Expression to access the expression editor tool. Enter Disabled Button Text to display when the custom button is disabled.
-
Use Visibility to determine button appearance based on a custom expression. Click Define Expression to access the expression editor tool.
Note:
For more about setting visibility and enablement for a custom button, see Filtering.
-
In Object Details, select Request from the
/System/Process/dropdown. By default, the message iscreate. Do not change it. -
Enter a Request name for the
/System/Process/Requestinstance. -
Enter the Attribute/Value Pairs fields if applicable.
-
Set Role Access. Selecting <By Role> will display available roles. Check applicable roles.
-
-
Click Add when you have confirmed that the button accomplishes the task you want.
The button will show in the object type you added the button to.
Please note that there are two ways of creating custom buttons, and creation through the “Automation > Automate > Generic Objects” screen will necessitate adding an attribute/value pair that is not required when adding through the “Automation > Customization > Buttons” screen.
Creating an Ansible Playbook Button
ManageIQ includes an option to create an Ansible Playbook custom button. This feature allows users to select a playbook to run as well as an inventory target to run it against. An Ansible playbook type button can be defined for any object type available.
Note:
An Ansible Playbook catalog item must exist in order to create an Ansible Playbook custom button. For more information, see Creating an Ansible Playbook Service Catalog Item in the Provisioning Virtual Machines and Hosts guide.
-
Navigate to menu:Automation[Automate > Customization].
-
Click the Buttons accordion.
-
From the Object Types tree, select the type of object you want to create the button for.
-
Click Unassigned Buttons.
-
Click
(Configuration), then
(Add a new Button).Note:
If
(Add a new Button) is not
available, that means you have not created a button group for that
object. To continue, see Creating a Custom Button Group. -
Select Ansible Playbook from the Button Type drop-down menu.
-
From the Playbook Catalog Item choose a playbook-backed catalog item to run.
-
Choose a host from the Inventory against which to run the playbook. If Specific Hosts is selected, input the IP address or DNS names for each host in the text field, separating each with a comma.
Note:
ManageIQ supports two configurations for host value input:
-
To allow user-provided host values, set the custom button to Specific Hosts and leave the associated text field blank.
-
To use admin-specified host values, remove the Hosts field when creating the dialog the service uses. In this configuration, the field will not appear to users. See Service Dialogs for information on generating a service dialog.
-
-
Type in a Text and Hover Text, and select the Icon you want to use.
-
Select an Icon Color from the color selection palette that pops up.
-
Check Open URL to open a browser window for the custom URL returned when the playbook is run.
-
Select display options for the Ansible Playbook button from the Display for drop-down menu. Choose for the button to display in the list view, for single entities, or both.
-
Choose how to submit objects to automate by selecting an option from the Submit drop-down menu. Selecting Submit all will pass all objects at once when the playbook is executed, while choosing One by one will run the the playbook each time per object.
-
Click Add when you have confirmed that the button accomplishes the task you want.
Editing a Custom Button
This procedure shows you how to edit a custom button.
-
Navigate to menu:Automation[Automate > Customization].
-
From the Object Types dropdown, select the type of object you want to edit the button for.
-
Click the button you want to edit.
-
Click
(Configuration),
(Edit this Button). -
Modify as required.
-
Click Save.
Deleting a Custom Button
This procedure shows you how to delete a custom button.
-
Navigate to menu:Automation[Automate > Customization], then select the Buttons accordion.
-
From the Object Type tree in the accordion menu, select the type of object you want to remove the button from.
-
Click
(Configuration). then click
 (Remove this button).
 -
Click OK to confirm that you want to delete this button.
Setting Enablement and Visibility for Custom Buttons
ManageIQ adds methods for evaluating an expression to determine whether a custom button is visible and enabled. Each method has a target object, for example, a virtual machine or host, and expressions can set a custom button to visible, hidden, or disabled.
Note:
Filtering works on single objects and is not applicable to lists.
To apply filtering actions to a custom button:
-
Navigate to menu:Automation[Automate > Customization].
-
Click the Buttons accordion. Select the custom button to use.
-
Click
(Configuration), then
(Edit this Button). -
Click the Advanced tab.
-
To set enablement filtering on a custom button:
-
Under Enablement, click on Define Expression.
-
Create a visibility expression using the expression editor tools.
-
Click
(Confirm) when finished
defining the expression. -
Provide Disabled Button Text in the field.
-
-
To set visibility filtering on a custom button:
-
Under Visibility, click on Define Expression.
-
Create a visibility expression using the expression editor tools.
-
Click
(Confirm) when finished
defining the expression.
-
-
Click Save.
Using a Custom Button
This procedure shows you how to use custom buttons to invoke a cluster, host, datastore, provider, virtual machine or instance.
-
Go to the page for the item that you created a button for.
-
Click the custom button group from the taskbar, and then your custom button.
The automate model is invoked for the specified item.
Initiating Automate from an Event
You can also use a ManageIQ Policy Event to initiate automation.
You can either use the provided Raise Automation Event action or create
a custom automation action. The first case will start in the
/System/Process class, but then go to the Event that initiated the
Automate model in the /System/Process/Event Class. If you create your
own custom action, it will start from the /System/Process class and
then go to the /System/Process/Request Class instead.
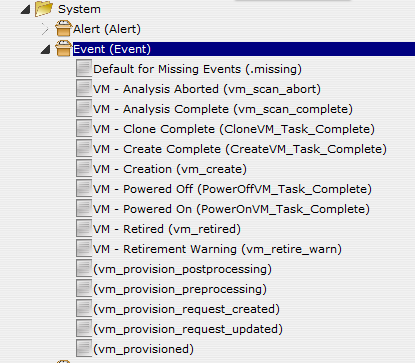
For example, suppose that you always want the same Automate model to
occur when a virtual machine is created. You would use the Raise
Automation Event Action. There are instances in the
/System/Process/Event Class for the following Events that you can
select as part of a Policy:
Creating a Policy for Automate
This procedure shows you how to create a policy for automate.
-
Navigate to menu:Control[Explorer].
-
Click the Policies accordion, and select Control Policies.
-
Select Vm Control Policies.
-
Click
(Configuration), then
(Add a New Control Vm Policy). -
Type in a Description.
-
Uncheck Active if you do not want this policy processed even when assigned to a resource.
-
Click Add. You are brought to the page where you add conditions and events to your new policy.
-
Click
(Configuration), then
(Edit this Policy’s Event
assignments).-
Check the events you want to use to send to an Automate Model.
-
Click Save.
-
From the Events area, click on the Description of the Event you want to assign an action to.
-
Click
(Edit Actions for this Policy
Event).
-
-
Select Raise Automation Event, and click
 (Move selected Actions into this
Event).
(Move selected Actions into this
Event). -
Click Save.
You can now assign this policy to a Policy Profile. Then, assign the policy profile to the virtual machines. Every time this event happens on the virtual machine the appropriate Automate Model will be initiated.
Note:
If you want the policy to initiate an Automate Model from the /System/Process/Request class, then you can create your own custom action. Be sure to have an instance in the /System/Process/Request class for it to map to.
Creating a Custom Automate Action
This procedure shows you how to create a custom Automate action.
-
Navigate to menu:Control[Explorer] accordion.
-
Click the Actions accordion.
-
Click
(Configuration), then
(Add a new Action). -
Type in a Description for the Action.
-
Select Invoke a Custom Automation from Action Type.
-
In Custom Automation,
-
For Message, type
create. -
For Request, type in the name of the instance of the
/System/Process/Request Classin the second.
-
-
Type in the Attribute/Value Pairs fields if applicable.
-
Click Add.
The action is created and can be added to a policy.
Objects
Virtual Machine Properties
When using these items in a method, prefix them with vm.. For example:
vm.storage_id.
| Friendly Name or Description | Raw Column Name |
|---|---|
| Allocated Disk Storage | allocated_disk_storage |
| Autostart | autostart |
| Blackbox Exists | blackbox_exists |
| Blackbox Validated | blackbox_validated |
| Boot Time | boot_time |
| Busy | busy |
| Cluster | ems_cluster_name |
| Configuration XML | config_xml |
| Connection State | connection_state |
| CPU Affinity | cpu_affinity |
| CPU Limit | cpu_limit |
| CPU Reserve | cpu_reserve |
| CPU Reserve Expand | cpu_reserve_expand |
| CPU Shares | cpu_shares |
| CPU Shares Level | cpu_shares_level |
| Created on Time | ems_created_on |
| Currently Used Space | used_storage_by_state |
| Datastore Path | v_datastore_path |
| Date Created | created_on |
| Date Updated | updated_on |
| Description | description |
| Ems | ems_id |
| Evm Owner | evm_owner_id |
| Evm Owner Email | evm_owner_email |
| Evm Owner Name | evm_owner_name |
| ManageIQ Unique ID (Guid) | guid |
| Format | format |
| Host | host_id |
| Host Name | host_name |
| Id | id |
| Is a Template | v_is_a_template |
| Last Analysis Attempt On | last_scan_attempt_on |
| Last Analysis Time | last_scan_on |
| Last Compliance Status | last_compliance_status |
| Last Compliance Timestamp | last_compliance_timestamp |
| Last Perf Capture On | last_perf_capture_on |
| Last Sync Time | last_sync_on |
| Location | location |
| Memory Limit | memory_limit |
| Memory Reserve | memory_reserve |
| Memory Reserve Expand | memory_reserve_expand |
| Memory Shares | memory_shares |
| Memory Shares Level | memory_shares_level |
| Name | name |
| OS Name | os_image_name |
| Owner | owner |
| Paravirtualization | paravirtualization |
| Parent Cluster | v_owning_cluster |
| Parent Datacenter | v_owning_datacenter |
| Parent Folder (Hosts & Clusters) | v_owning_folder |
| Parent Folder (VMs & Templates) | v_owning_blue_folder |
| Parent Folder Path (Hosts & Clusters) | v_owning_folder_path |
| Parent Folder Path (VMs & Templates) | v_owning_blue_folder_path |
| Parent Host Platform | v_host_vmm_product |
| Parent Resource Pool | v_owning_resource_pool |
| Pct Free Disk | v_pct_free_disk_space |
| Platform | platform |
| Power State | power_state |
| Previous State | previous_state |
| Registered | registered |
| Reserved | reserved |
| Retired | retired |
| Retirement | retirement |
| Retires On | retires_on |
| Service | service_id |
| Smart | smart |
| Standby Action | standby_action |
| State Changed On | state_changed_on |
| Storage | storage_id |
| Storage Name | storage_name |
| Template | template |
| Thin Provisioned | thin_provisioned |
| Tools Status | tools_status |
| Total Provisioned Space | provisioned_storage |
| Total Snapshots | v_total_snapshots |
| Total Used Disk Space | used_disk_storage |
| Uid Ems | uid_ems |
| Uncommitted Space | uncommitted_storage |
| Used Storage | used_storage |
| V Pct Used Disk Space | v_pct_used_disk_space |
| VDI Available | vdi_available |
| VDI Connection DNS Name | vdi_connection_dns_name |
| VDI Connection Logon Server | vdi_connection_logon_server |
| VDI Connection Name | vdi_connection_name |
| VDI Connection Remote IP Address | vdi_connection_remote_ip_address |
| VDI Connection Session Name | vdi_connection_session_name |
| VDI Connection Session Type | vdi_connection_session_type |
| VDI Connection URL | vdi_connection_url |
| VDI Endpoint IP Address | vdi_endpoint_ip_address |
| VDI Endpoint MAC Address | vdi_endpoint_mac_address |
| VDI Endpoint Name | vdi_endpoint_name |
| VDI Endpoint Type | vdi_endpoint_type |
| VDI User Appdata | vdi_user_appdata |
| VDI User DNS Domain | vdi_user_dns_domain |
| VDI User Domain | vdi_user_domain |
| VDI User Home Drive | vdi_user_home_drive |
| VDI User Home Path | vdi_user_home_path |
| VDI User Home Share | vdi_user_home_share |
| VDI User Logon Time | vdi_user_logon_time |
| VDI User Name | vdi_user_name |
| Vendor | vendor |
| Version | version |
| VMsafe Agent Address | vmsafe_agent_address |
| VMsafe Agent Port | vmsafe_agent_port |
| VMsafe Enable | vmsafe_enable |
| VMsafe Fail Open | vmsafe_fail_open |
| VMsafe Immutable VM | vmsafe_immutable_vm |
| VMsafe Timeout (ms) | vmsafe_timeout_ms |
Virtual Machine Properties
Methods for use in Ruby Scripts
To use one of these in one of your own Ruby methods, use the syntax of
vm.method. For example, to reboot the guest operating system, use
vm.rebootGuest.
| Method | Description |
|---|---|
| start | Start Virtual Machine container. |
| stop | Stop Virtual Machine container. |
| suspend | Suspend Virtual Machine container. |
| unregister | Unregister Virtual Machine. |
| collect_running_processes | Collect the running processes from a started Virtual Machine. |
| shutdownGuest | Shutdown the guest operating system of the VM container. Requires VMware tools (or vendors tools) installed on the guest. |
| standbyGuest | Put the guest operating system into standby. Requires VMware tools (or vendors tools) installed on the guest. |
| rebootGuest | Reboot the guest operating system. Requires VMware tools (or vendors tools) installed on the guest. |
Host Properties
When using these items in a method, prefix them with host, such as
host.ems_id.
| Friendly Name or Description | Raw Column Name |
|---|---|
| All Enabled Ports | all_enabled_ports |
| Annotation | v_annotation |
| Authentication Status | Authentication_status |
| Connection State | connection_state |
| CPU usage MHz rate average over time period | cpu_usagemhz_rate_average_avg_over_time_period |
| CPU usage MHz rate high over time period | cpu_usagemhz_rate_average_high_over_time_period |
| CPU usage MHz rate low over time period | cpu_usagemhz_rate_average_low_over_time_period |
| Custom Attribute 1 | custom_1 |
| Custom Attribute 2 | custom_2 |
| Custom Attribute 3 | custom_3 |
| Custom Attribute 4 | custom_4 |
| Custom Attribute 5 | custom_5 |
| Custom Attribute 6 | custom_6 |
| Custom Attribute 7 | custom_7 |
| Custom Attribute 8 | custom_8 |
| Custom Attribute 9 | custom_9 |
| Date Created | created_on |
| Derived memory usage average over time period | derived_memory_used_avg_over_time_period |
| Derived memory usage high over time period | derived_memory_used_high_over_time_period |
| Derived memory usage low over time period | derived_memory_used_low_over_time_period |
| Ems | ems_id |
| Enabled Inbound Ports | enabled_inbound_ports |
| Enabled Outbound Ports | enabled_outbound_ports |
| Enabled Run Level 0 Services | enabled_run_level_0_services |
| Enabled Run Level 1 Services | enabled_run_level_1_services |
| Enabled Run Level 2 Services | enabled_run_level_2_services |
| Enabled Run Level 3 Services | enabled_run_level_3_services |
| Enabled Run Level 4 Services | enabled_run_level_4_services |
| Enabled Run Level 5 Services | enabled_run_level_5_services |
| Enabled Run Level 6 Services | enabled_run_level_6_services |
| Enabled TCP Inbound Ports | enabled_tcp_inbound_ports |
| Enabled TCP Outbound Ports | enabled_tcp_outbound_ports |
| Enabled UDP Inbound Ports | enabled_udp_inbound_ports |
| Enabled UDP Outbound Ports | enabled_udp_outbound_ports |
| EVM Unique ID (Guid) | guid |
| Hostname | hostname |
| Id | id |
| IP Address | ipaddress |
| Last Compliance Status | last_compliance_status |
| Last Compliance Timestamp | last_compliance_timestamp |
| Last Perf Capture On | last_perf_capture_on |
| Last Analysis Time | last_scan_on |
| Name | name |
| OS Name | os_image_name |
| Platform | platform |
| Power State | power_state |
| Region Description | region_description |
| Region Number | region_number |
| Reserved | reserved |
| Service Names | service_names |
| Settings | settings |
| Smart | smart |
| SSH Root Access | ssh_permit_root_login |
| Uid Ems | uid_ems |
| Date Updated | updated_on |
| User Assigned Os | user_assigned_os |
| Parent Cluster | v_owning_cluster |
| Parent Datacenter | v_owning_datacenter |
| Parent Folder (Hosts & Clusters) | v_owning_folder |
| Total Datastores | v_total_storages |
| Total VMs | v_total_vms |
| VMM Build Number | vmm_buildnumber |
| VMM Platform | vmm_product |
| VMM Vendor | vmm_vendor |
| VMM Version | vmm_version |
Provider Properties
When using these items in a method, prefix them with ems, such as
ems.ems_id.
| Friendly Name or Description | Raw Column Name |
|---|---|
| Aggregate VM CPUs | aggregate_vm_cpus |
| Aggregate VM Memory | aggregate_vm_memory |
| CPU Ratio | v_cpu_vr_ratio |
| CPU Usage MHZ Rate Average High Over Time Period | cpu_usagemhz_rate_average_high_over_time_period” |
| CPU Usage MHZ Rate Average Low Over Time Period | cpu_usagemhz_rate_average_low_over_time_period |
| CPU Usage MHZ Rate Average Over Time Period | cpu_usagemhz_rate_average_avg_over_time_period |
| Date Created | created_on |
| Date Updated | updated_on |
| Derived Memory Usage Rate Average High Over Time Period | derived_memory_used_high_over_time_period |
| Derived Memory Usage Rate Average Low Time Period | derived_memory_used_low_over_time_period |
| Derived Memory Usage Rate Average Over Time Period | derived_memory_used_avg_over_time_period |
| Distributed Resource Scheduler Automation Level | drs_automation_level |
| Distributed Resource Scheduler Enabled | drs_enabled |
| Distributed Resource Scheduler Migration Threshold | drs_migration_threshold |
| EMS ID | ems_id |
| EVM Zone | zone_name |
| High-Availability Admission Control | ha_admit_control |
| High-Availability Enabled | ha_enabled |
| High-Availability Max Failures | ha_max_failures |
| Id | id |
| Last Performance Data Captured | last_perf_capture_on |
| Last Smart State Analysis | last_scan_on |
| Memory Ratio | v_ram_vr_ratio |
| Name | name |
| Parent Datacenter | v_parent_datacenter |
| Qualified Description | v_qualified_desc |
| Region Description | region_description |
| Region Number | region_number |
| Reserved | reserved |
| Total CPU Speed | aggregate_cpu_speed |
| Total Hosts | total_hosts |
| Total Memory | aggregate_memory |
| Total Number of Logical CPUs | aggregate_logical_cpus |
| Total Number of Physical CPUs | aggregate_physical_cpus |
| Total Vms | total_vms |
| Unique Identifier | uid_ems |
Storage Properties
When using these items in a method, prefix them with storage, such as
storage.name.
| Friendly Name or Description | Raw Column Name |
|---|---|
| Date Created | created_on |
| Date Updated | updated_on |
| Disk Files Percent of Used | v_disk_percent_of_used |
| Free Space | free_space |
| Free Space Percent of Total | v_free_space_percent_of_total |
| Id | id |
| Last Analysis Time | last_scan_on |
| Last Perf Capture On | last_perf_capture_on |
| Location | location |
| Multiple Host Access | multiplehostaccess |
| Name | name |
| Non-VM Files Percent of Used | v_debris_percent_of_used |
| Other VM Files Percent of Used | v_vm_misc_percent_of_used |
| Provisioned Space Percent of Total | v_provisioned_percent_of_total |
| Reserved | reserved |
| Size of Non-VM Files | v_total_debris_size |
| Size of Other VM Files | v_total_vm_misc_size |
| Size of VM Memory Files | v_total_vm_ram_size |
| Size of VM Snapshot Files | v_total_snapshot_size |
| Snapshot Files Percent of Used | v_snapshot_percent_of_used |
| Store Type | store_type |
| Total Hosts | v_total_hosts |
| Total Managed Registered Vms | total_managed_registered_vms |
| Total Managed Unregistered Vms | total_managed_unregistered_vms |
| Total Provisioned Space | v_total_provisioned |
| Total Space | total_space |
| Total Unmanaged Vms | total_unmanaged_vms |
| Total VMs | v_total_vms |
| Uncommitted | uncommitted |
| Used Space | v_used_space |
| Used Space Percent of Total | v_used_space_percent_of_total |
| VM Memory Files Percent of Used | v_memory_percent_of_used |
Storage Properties
FAQs and Flows
Phase 1: Create Provision Request
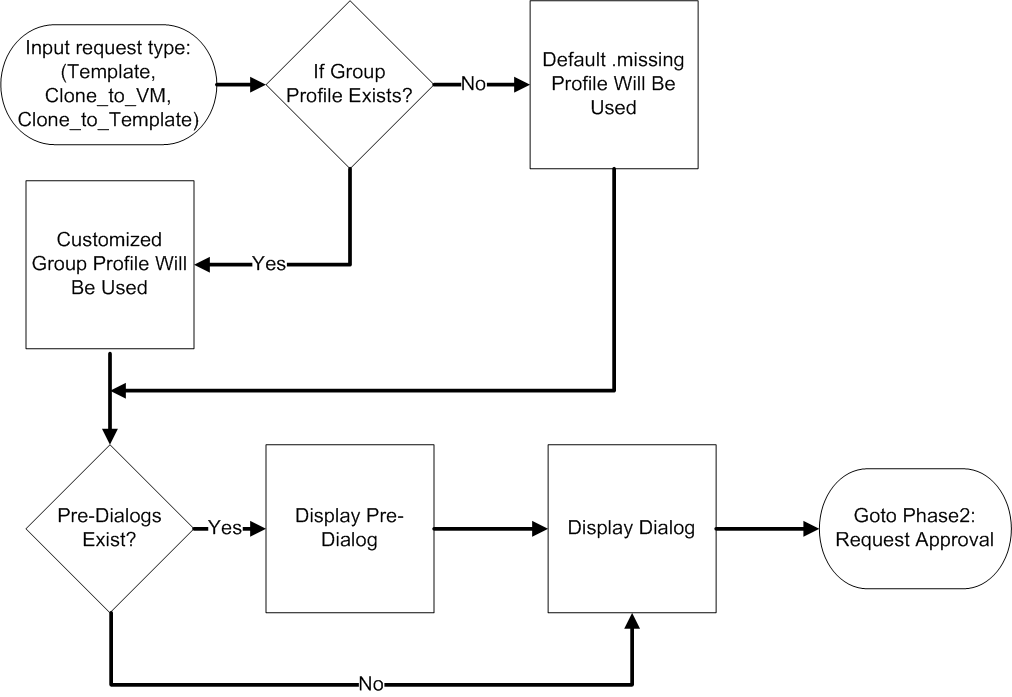
| Question | Answer |
|---|---|
| Where do I create a new provisioning profile based on a users LDAP group? | Navigate to [VM / Provisioning / Profile] of either the Cloud or Infrastructure namespace in your domain. |
| Where can I specify a pre-dialog to present to a Requester in their LDAP group? | Custom pre-dialogs can be defined in [`VM / Provisioning / |
| Profile / |
|
| I would like to customize our dialogs. Where are all the dialogs kept? | All dialogs are located on each ManageIQ appliance in the /var/www/miq/vmdb/db/fixtures directory. |
| What happens if I do not specify any profiles for provisioning? | ManageIQ searches for a matching LDAP group in the [VM / Provisioning / Profile] class of either the Cloud or Infrastructure namespace in your domain. If an LDAP profile is NOT found then ManageIQ will use the missing class instance. |
Phase 2: Request Approval
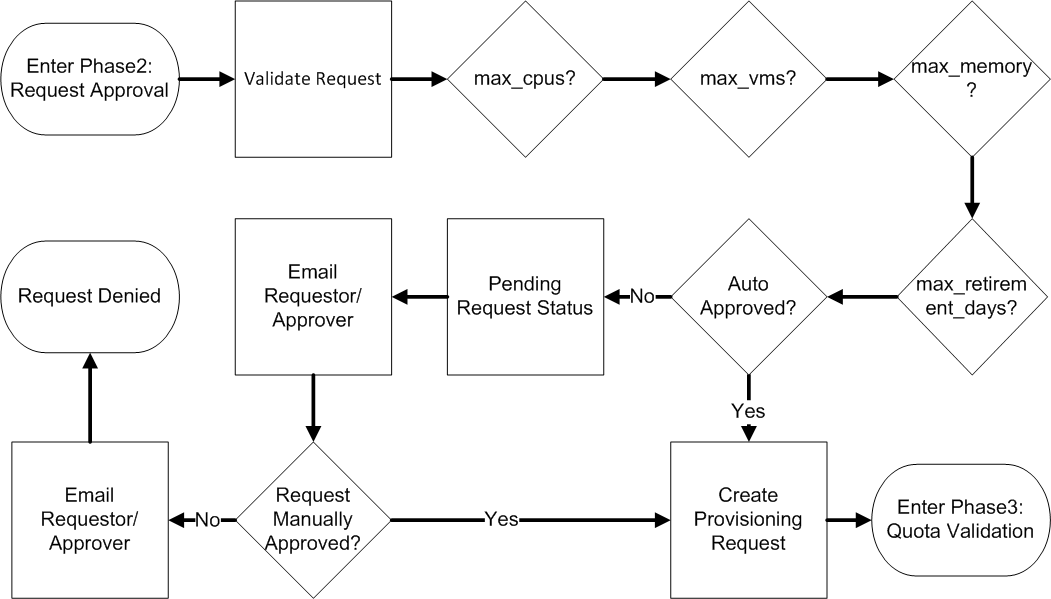
| Question | Answer |
|---|---|
| Where can I specify auto-approval values on a per virtual machine template basis? | Tags can be assigned to templates in the form of [prov_max_vms, prov_max_cpus, prov_max_memory, prov_max_retirement_days]. |
| Where can I modify the default Auto-Approval values? | These values can be set in the [`Service / Provisioning / StateMachines / |
| ServiceProvisionRequestApproval / Default`] class instance in your domain. | |
| How can I customize the email that is sent when a request is approved? | The Request Approved email message can be modified in [VM / Provisioning / Email / MiqProvisionRequest_Approved] in either the Cloud or Infrastructure namespace of your domain. |
| How can I customize the email that is sent when a request is denied? | The Request Denied email message can be modified in [VM / Provisioning / Email / MiqProvisionRequest_Denied] in either the Cloud or Infrastructure namespace of your domain. |
| How can I customize the email that is sent when a request is not Auto-approved? | The Request Pending email message can be modified in [VM / Provisioning / Email / MiqProvisionRequest_Denied] in either the Cloud or Infrastructure namespace of your domain. |
| If a Request Approval requires manual approval, how does an Approver approve the request? | Log into ManageIQ as an approver/admin and navigate to menu:Virtual Machines[Requests] and then click on the request. |
Phase 3: Quota Validation
| Question | Answer |
|---|---|
| Where in ManageIQ can I set default quota thresholds for users and groups? | These values can be set in the [`VM |
| Provisioning / StateMachines / ProvisionRequestQuotaVerification`] class instance of either the Cloud or Infrastructure namespace in your domain. | |
| Where in ManageIQ can I set individual and group quota thresholds? | Tags can be assigned to groups or users by navigating to menu:Configuration[Access Control]. The following are valid tags that can be assigned to group or individual users: [quota_max_cpu, quota_max_memory, quota_max_storage]. |
| Where can I customize the way our virtual machines are named? | Virtual machine naming conventions can be altered using the methods in the [`VM / |
| Provisioning / Naming`] class of either the Cloud or Infrastructure namespace in your domain. | |
| How can I customize the email that is sent when a request is denied? | The Request Denied email message can be modified in the [`VM / |
| Provisioning / Email / MiqProvisionRequest_Denied`] in either the Cloud or Infrastructure namespace of your domain. |
Phase 4: Provisioning
Target Type: Cloning a Template to a Virtual Machine.

Target Type: Clone to Template.

| Question | Answer |
|---|---|
| Where can I customize the email message that is sent upon provisioning completion? | This can be customized using the [`VM / Provisioning / Email |
| / MiqProvision_Complete` ] in either the Cloud or Infrastructure namespace of your domain. | |
| Where can I change what is put into the virtual machines Annotation after provisioning? | These settings can be modified by leveraging the _PreProvision Ruby methods in [`VM / Provisioning / StateMachines / |
| Methods`] in either the *Cloud</emphasis> or Infrastructure namespace of your domain. | |
| Where do I set the default VC folder location for provisioning virtual machines? | This can be modified by leveraging by leveraging the _PreProvision Ruby methods in [`VM / Provisioning / StateMachines / |
| Methods`] in either the *Cloud</emphasis> or Infrastructure namespace of your domain. | |
| Where can I modify the virtual machine customization spec mapping? | This can be modified by leveraging by leveraging the `_PreProvision |
Ruby methods in \[VM / Provisioning / StateMachines / Methods`] in either the *Cloud</emphasis> or Infrastructure namespace of your domain. |
|
| Where can I modify the Clone_to_Template state_machine? | Navigate to [VM / Provisioning / StateMachines / VMProvision_VM / template] in either the Cloud or Infrastructure namespace of your domain. |
| Where can I modify the Clone_to_VM state_machine? | Navigate to [`VM / |
| Provisioning / StateMachines / VMProvision_VM / clone_to_vm`] in either the Cloud or Infrastructure namespace of your domain. |
Phase 5: Retirement
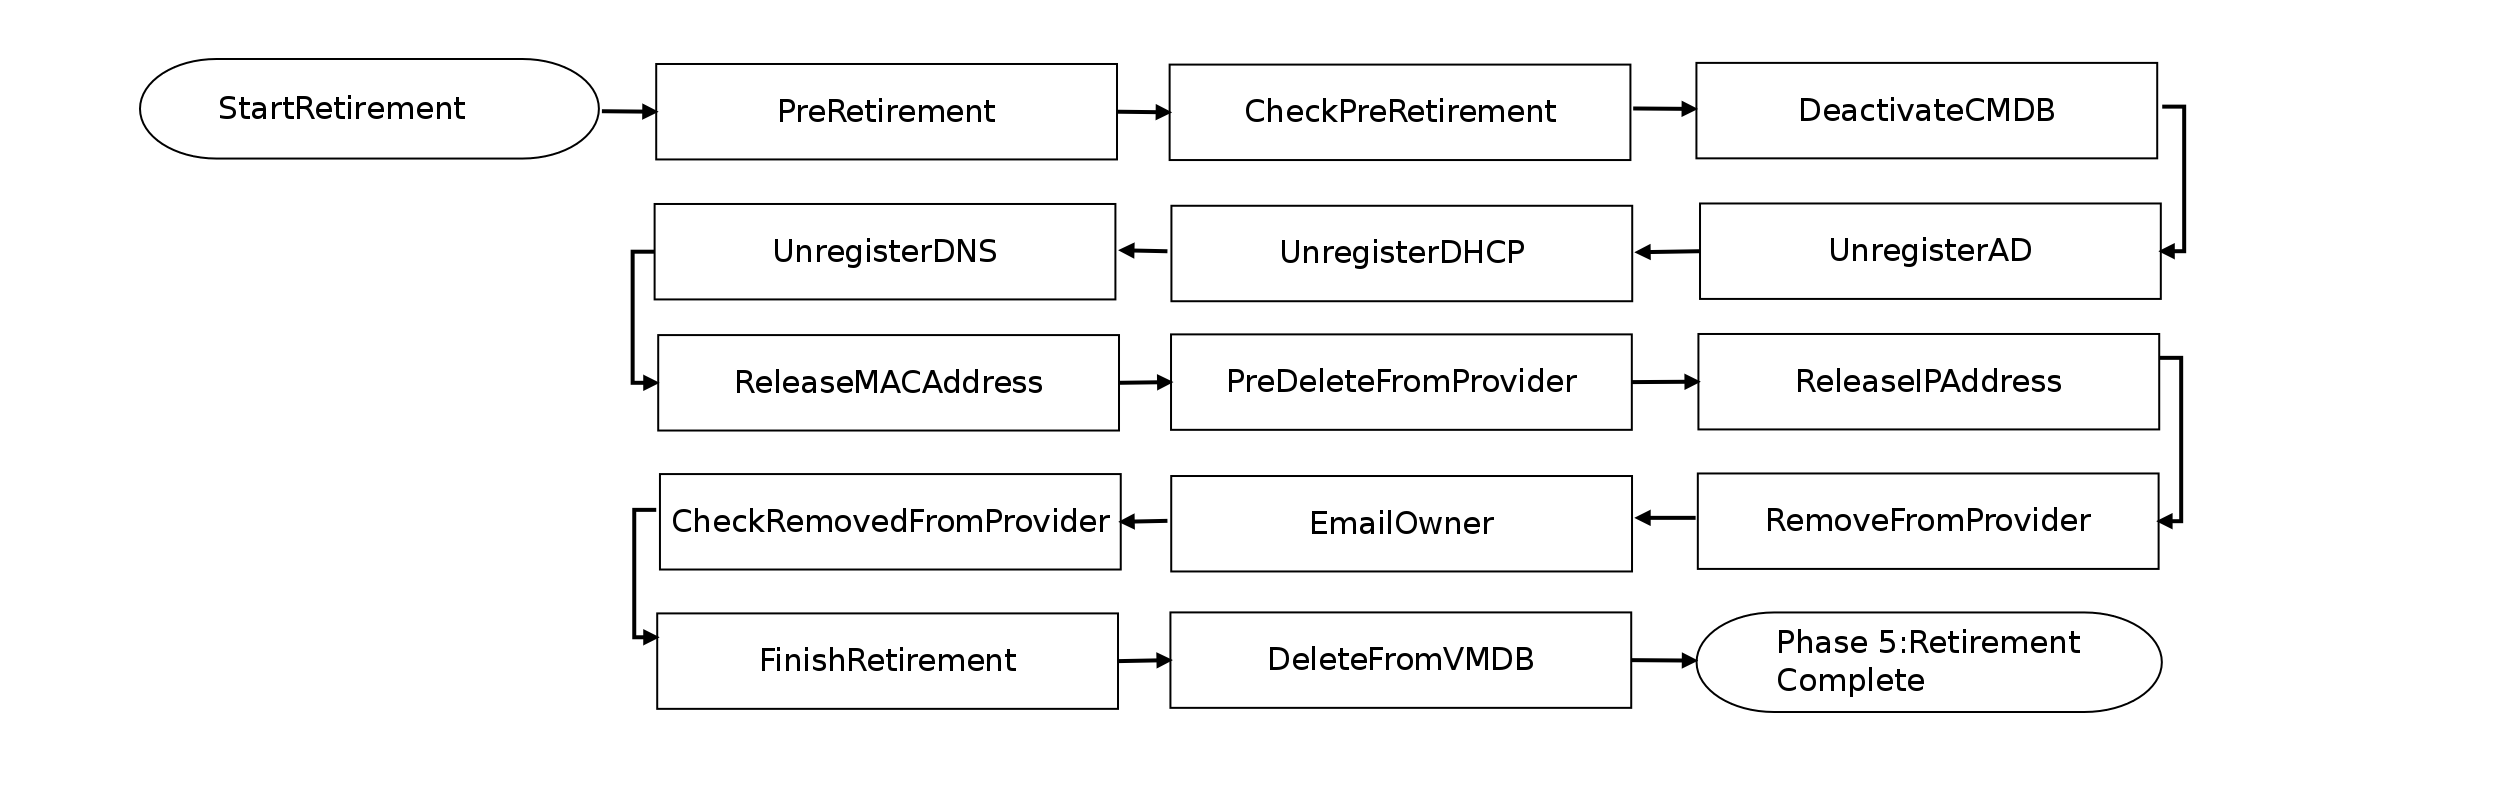
| Question | Answer |
|---|---|
| Where can I customize the email message that is sent upon completion of virtual machine retirement? | This can be customized using the [`VM / |
| Retirement / Email / vm_retirement_emails`] in either the Cloud or Infrastructure namespace of your domain. | |
| Where can I customize the email message that is sent during virtual machine retirement warnings? | This can be customized using the [`VM / |
| Retirement / Email / vm_retirement_emails`] in either the Cloud or Infrastructure namespace of your domain. | |
| If I want to customize what gets called during the retirement phase where should I look? | This can be customized using the [`VM / Retirement |
| / StateMachines / VMRetirement`] in either the Cloud or Infrastructure namespace of your domain. | |
| How can I extend the virtual machine retirement date an additional number of days? | Create a custom button for virtual machines that launches [/System/Request/vm_retire_extend]. Then navigate to the [`VM / |
Retirement / Email / vm_retire_extend\] Ruby method in the **Cloud** or **Infrastructure** namespaces and set the vm_retire_extend_days` value. |
Inline Method to Create a Provision Request
Ruby method
# ManageIQ Automate Method
#
$evm.log("info", "ManageIQ Automate Method  Building VM Provisioning Request Started")
#

prov= $evm.root['miq_provision']

  # arg1 = version
  args = ['1.1']
  # arg2 = templateFields
  args << {'name' => 'App'}
  # arg3 = vmFields
  args << {'vm_name' => 'CRM_APP', 'request_type' => 'template'}
  # arg4 =  requester
  args << {'owner_email' => 'admin@asd.com', 'owner_last_name' => 'Admin', 'owner_first_name' => 'Admin', 'user_name' => 'admin'}
  # arg5 =  tags
  args << {'crm' => 'true'}
  # arg6 =  WS Values
  args << nil
  # arg7 = emsCustomAttributes
  args << nil
  # arg8 = miqCustomAttributes
  args << nil

$evm.log("info","Building provisioning request with the following arguments: <#{args.inspect}>")
result = $evm.execute('create_provision_request', *args)
Migrating Custom Buttons
Migrating Custom Buttons
This workflow demonstrates how to export custom buttons from one ManageIQ appliance and import them in another ManageIQ appliance.
-
Export custom buttons from the source ManageIQ appliance:
-
SSH into the ManageIQ appliance as
root. -
Create a temporary directory:
# mkdir /tmp/custom_buttons -
Navigate to the Virtual Management Database (VMDB) directory:
# vmdb -
Export custom buttons using the following
rakecommand:# rake evm:export:custom_buttons -- --directory /tmp/custom_buttons -
Confirm the
yamlfile was created by navigating to the new directory:# cd /tmp/custom_buttons
-
-
Copy the directory to the target ManageIQ appliance:
scp -r /tmp/custom_buttons/ hostname:/tmp/custom_buttons -
Import custom buttons on the target ManageIQ appliance:
-
SSH to the target ManageIQ appliance as
root. -
Navigate to the VMDB directory:
# vmdb -
Import custom buttons using the following
rakecommand:# rake evm:import:custom_buttons -- --source /tmp/custom_buttons
-
To verify successful import of custom buttons:
-
Log in to the target ManageIQ appliance.
-
Navigate to menu:Automation[Automate > Customization].
-
Click Buttons in the accordion menu.
Imported buttons will appear under the parent Object Type.