- Installing on Red Hat OpenStack Platform
- Appendix
- Appliance Console Command-Line Interface (CLI)
Installing on Red Hat OpenStack Platform
Installing ManageIQ
Installing ManageIQ consists of the following steps:
-
Downloading the appliance for your environment as a virtual machine image template.
-
Setting up a virtual machine based on the appliance.
-
Configuring the ManageIQ appliance.
After you have completed all the procedures in this guide, you will have a working environment on which additional customizations and configurations can be performed.
Obtaining the appliance
Uploading the Appliance on OpenStack
Log in to your OpenStack dashboard to upload your ManageIQ appliance.
-
Log in to the OpenStack dashboard.
-
In the Project tab, navigate to menu:Compute[Images].
-
Click Create Image.
-
In Name, enter a name for the image.
-
From Image Source list, select Image Location. Note that currently only images available via an HTTP URL are supported.
-
In Image Location, add an external (HTTP) URL to load the image from. For example, http://example.com/image.iso.
- From the Format list, select the image format. For example, `ISO
- Optical Disk Image`.
-
Specify the Architecture. For example,
i386for a 32-bit architecture orx86-64for a 64-bit architecture. -
Leave the Minimum Disk (GB) and Minimum RAM (MB) fields empty.
-
Check the Public box to make the appliance available to all users.
-
Check the Protected box to protect the image from being accidentally deleted.
- Click Create Image.
You have successfully uploaded the ManageIQ appliance.
The appliance image is placed in a queue to be uploaded. It may take some time before the Status of the image changes from Queued to Active.
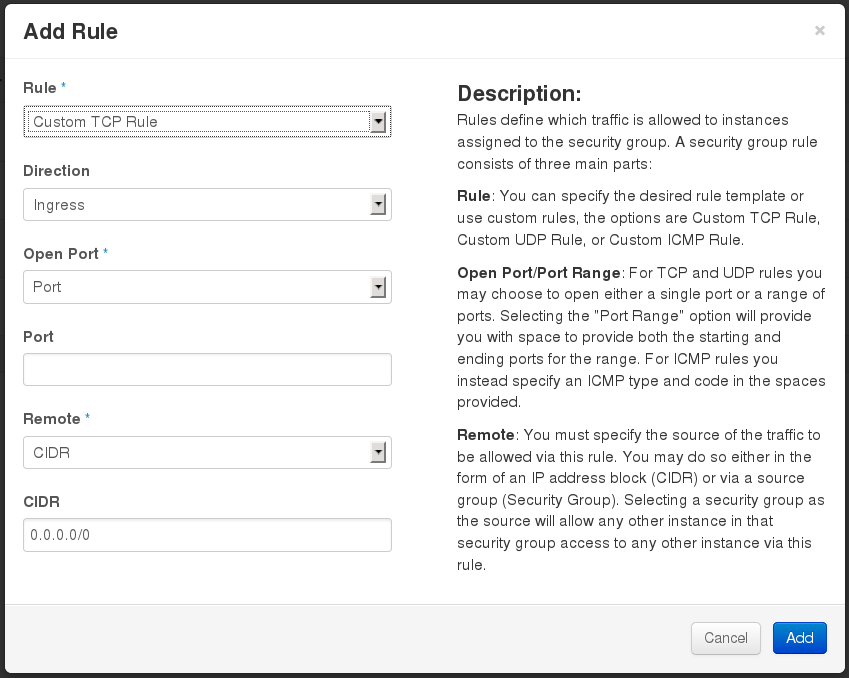
Adding a Rule to a Security Group
Security groups specify what IP traffic is allowed to reach an instance on its public IP address. Security group rules are processed before network traffic reaches firewall rules defined within the guest itself.
Note:
In the default configuration, the default security group accepts all connections from the default source; all instances within the default group can talk to each other on any port.
-
From the OpenStack dashboard, navigate to menu:Project[Compute > Access & Security].
-
Navigate to menu:Security Groups[Manage Rules] on the row for the default security group.

-
Click Add Rule.
-
Configure the rule.
-
Select menu:Rule[Custom TCP Rule].
-
Select menu:Direction[Ingress].
-
Select Port from the Open Port list.
-
Specify
443in the Port field. -
Select CIDR from the Remote list.
-
Specify
0.0.0.0/0in the CIDR field. -
Click Add.
-
Creating a Custom Flavor
A flavor is a resource allocation profile that specifies, for example, how many virtual CPUs and how much RAM can be allocated to an instance. You can, for example, run ManageIQ on a Red Hat OpenStack m1.large flavor, which specifies a virtual machine with 4 cores, 12 GB RAM, and 80 GB disk space. Creating a flavor to run ManageIQ is optional.
The following procedure demonstrates creating a flavor with the minimum requirements (4 cores, 12 GB RAM, 44 GB disk space) for ManageIQ. For more information about flavors, see the Red Hat OpenStack Platform Administration User Guide.
-
Log in to the OpenStack dashboard as admin.
-
In the Admin tab, navigate to menu:System[Flavors].
-
Click Create Flavor to display the Create Flavor dialog.
-
Configure the settings to define a flavor that meets ManageIQ system requirements.
-
Enter a name for the flavor.
-
Enter the following settings:
-
VCPUs: 4
-
RAM MB: 12288
-
Root Disk GB: 70
-
Ephemeral Disk GB: 0
-
Swap Disk MB: 0
-
-
-
Click Create Flavor.
A new flavor specific to ManageIQ is created.
Launching the Instance
-
From the OpenStack dashboard, navigate to menu:Project[Compute > Instances].
-
Click Launch Instance.
-
Enter a name for the instance.
-
Select the custom flavor for your instance. The flavor selection determines the computing resources available to your instance. The resources used by the flavor are displayed in the Flavor Details pane.
-
Enter 1 in the Instance Count field.
-
Select a boot option from the Instance Boot Source list:
-
Boot from image - displays a new field for Image Name. Select the image from the drop-down list.
-
Boot from snapshot - displays a new field for Instance Snapshot. Select the snapshot from the drop-down list.
-
Boot from volume - displays a new field for Volume. Select the volume from the drop-down list.
-
Boot from image (creates a new volume) - boot from an image and create a volume by choosing Device Size and Device Name for your volume. Some volumes can be persistent. To ensure the volume is deleted when the instance is deleted, select Delete on Terminate.
-
Boot from volume snapshot (creates a new volume) - boot from volume snapshot and create a new volume by choosing Volume Snapshot from the drop-down list and adding a Device Name for your volume. Some volumes can be persistent. To ensure the volume is deleted when the instance is deleted, select Delete on Terminate.
-
-
Click Networking and select a network for the instance by clicking the + (plus) button for the network from Available Networks.
-
Click Launch.
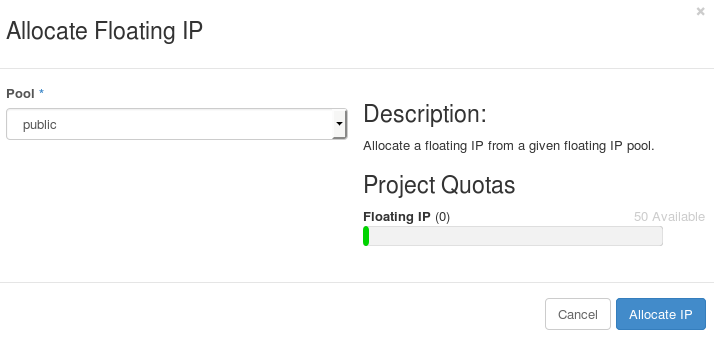
Adding a Floating IP Address
When you create an instance, Red Hat OpenStack Platform automatically assigns it a fixed IP address in the network to which the instance belongs. This IP address is permanently associated with the instance until the instance is terminated.
In addition to the fixed address, you can also assign a floating IP address to an instance. Unlike fixed IP addresses, you can modify floating IP addresses associations at any time, regardless of the state of the instances involved.
-
At the command-line on your RHEL OpenStack Platform host, create a pool of floating IP addresses using the
nova-manage floating
create
command. Replace IP_BLOCK with the desired block of IP addresses expressed in CIDR notation.$ nova-manage floating create IP_BLOCK -
In the Project tab, navigate to menu:Compute[Access & Security].
-
Click menu:Floating IPs[Allocate IP To Project]. The Allocate Floating IP window is displayed.
-
Click Allocate IP to allocate a floating IP from the pool. The allocated IP address appears in the Floating IPs table.
-
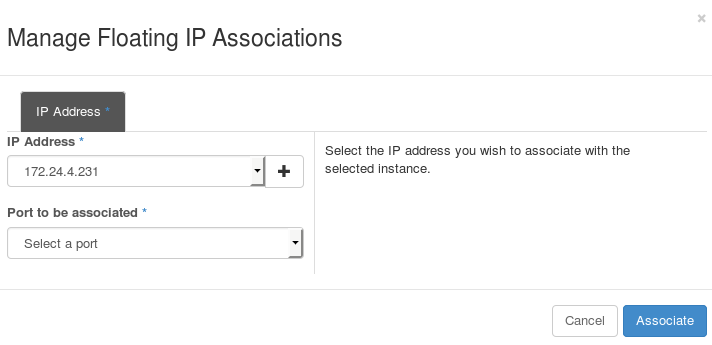
Select the newly allocated IP address from the Floating IPs table. Click Associate to assign the IP address to a specific instance.
-
Select an instance with which to associate the floating IP Address.
-
Click Associate to associate the IP address with the selected instance.
Note:
To disassociate a floating IP address from an instance when it is no longer required, click Release Floating IPs.
Configuring ManageIQ
After installing ManageIQ and running it for the first time, you must perform some basic configuration. To configure ManageIQ, you must at a minimum:
-
Add a disk to the infrastructure hosting your appliance.
-
Configure the database.
Configure the ManageIQ appliance using the internal appliance console.
Accessing the Appliance Console
-
Start the appliance and open a terminal console.
-
Enter the
appliance_consolecommand. The ManageIQ appliance summary screen displays. -
Press
Enterto manually configure settings. -
Press the number for the item you want to change, and press
Enter. The options for your selection are displayed. -
Follow the prompts to make the changes.
-
Press
Enterto accept a setting where applicable.
Note:
The ManageIQ appliance console automatically logs out after five minutes of inactivity.
Configuring a Database
ManageIQ uses a database to store information about the environment. Before using ManageIQ, configure the database options for it; ManageIQ provides the following two options for database configuration:
-
Install an internal PostgreSQL database to the appliance
-
Configure the appliance to use an external PostgreSQL database
Configuring an Internal Database
-
Start the appliance and open a terminal console.
-
Enter the
appliance_consolecommand. The ManageIQ appliance summary screen displays. -
Press Enter to manually configure settings.
-
Select Configure Database from the menu.
-
You are prompted to create or fetch an encryption key.
-
If this is the first ManageIQ appliance, choose Create key.
-
If this is not the first ManageIQ appliance, choose Fetch key from remote machine to fetch the key from the first appliance. For worker and multi-region setups, use this option to copy key from another appliance.
Note:
All ManageIQ appliances in a multi-region deployment must use the same key.
-
-
Choose Create Internal Database for the database location.
-
Choose a disk for the database. This can be either a disk you attached previously, or a partition on the current disk.
Red Hat recommends using a separate disk for the database.If there is an unpartitioned disk attached to the virtual machine, the dialog will show options similar to the following:
1) /dev/vdb: 20480 2) Don't partition the disk-
Enter 1 to choose
/dev/vdbfor the database location. This option creates a logical volume using this device and mounts the volume to the appliance in a location appropriate for storing the database. The default location is/var/lib/pgsql, which can be found in the environment variable$APPLIANCE_PG_MOUNT_POINT. -
Enter 2 to continue without partitioning the disk. A second prompt will confirm this choice. Selecting this option results in using the root filesystem for the data directory (not advised in most cases).
-
-
Enter Y or N for Should this appliance run as a standalone database server?
-
Select Y to configure the appliance as a database-only appliance. As a result, the appliance is configured as a basic PostgreSQL server, without a user interface.
-
Select N to configure the appliance with the full administrative user interface.
-
-
When prompted, enter a unique number to create a new region.
Creating a new region destroys any existing data on the chosen database. -
Create and confirm a password for the database.
ManageIQ then configures the internal database. This takes a few minutes. After the database is created and initialized, you can log in to ManageIQ.
Configuring an External Database
Based on your setup, you will choose to configure the appliance to use an external PostgreSQL database. For example, we can only have one database in a single region. However, a region can be segmented into multiple zones, such as database zone, user interface zone, and reporting zone, where each zone provides a specific function. The appliances in these zones must be configured to use an external database.
The postgresql.conf file used with ManageIQ databases requires
specific settings for correct operation. For example, it must correctly
reclaim table space, control session timeouts, and format the PostgreSQL
server log for improved system support. Due to these requirements, Red
Hat recommends that external ManageIQ databases use a
postgresql.conf file based on the standard file used by the
ManageIQ appliance.
Ensure you configure the settings in the postgresql.conf to suit your
system. For example, customize the shared_buffers setting according to
the amount of real storage available in the external system hosting the
PostgreSQL instance. In addition, depending on the aggregate number of
appliances expected to connect to the PostgreSQL instance, it may be
necessary to alter the max_connections setting.
Note:
-
ManageIQ requires PostgreSQL version 9.5.
-
Because the
postgresql.conffile controls the operation of all databases managed by a single instance of PostgreSQL, do not mix ManageIQ databases with other types of databases in a single PostgreSQL instance.
-
Start the appliance and open a terminal console.
-
Enter the
appliance_consolecommand. The ManageIQ appliance summary screen displays. -
Press Enter to manually configure settings.
-
Select Configure Database from the menu.
-
You are prompted to create or fetch a security key.
-
If this is the first ManageIQ appliance, choose Create key.
-
If this is not the first ManageIQ appliance, choose Fetch key from remote machine to fetch the key from the first appliance.
Note:
All ManageIQ appliances in a multi-region deployment must use the same key.
-
-
Choose Create Region in External Database for the database location.
-
Enter the database hostname or IP address when prompted.
-
Enter the database name or leave blank for the default (
vmdb_production). -
Enter the database username or leave blank for the default (
root). -
Enter the chosen database user’s password.
-
Confirm the configuration if prompted.
ManageIQ will then configure the external database.
Configuring a Worker Appliance
You can use multiple appliances to facilitate horizontal scaling, as well as for dividing up work by roles. Accordingly, configure an appliance to handle work for one or many roles, with workers within the appliance carrying out the duties for which they are configured. You can configure a worker appliance through the terminal. The following steps demonstrate how to join a worker appliance to an appliance that already has a region configured with a database.
-
Start the appliance and open a terminal console.
-
Enter the
appliance_consolecommand. The ManageIQ appliance summary screen displays. -
Press Enter to manually configure settings.
-
Select Configure Database from the menu.
-
You are prompted to create or fetch a security key. Since this is not the first ManageIQ appliance, choose 2) Fetch key from remote machine. For worker and multi-region setups, use this option to copy the security key from another appliance.
Note:
All ManageIQ appliances in a multi-region deployment must use the same key.
-
Choose Join Region in External Database for the database location.
-
Enter the database hostname or IP address when prompted.
-
Enter the port number or leave blank for the default (
5432). -
Enter the database name or leave blank for the default (
vmdb_production). -
Enter the database username or leave blank for the default (
root). -
Enter the chosen database user’s password.
-
Confirm the configuration if prompted.
Logging In After Installing ManageIQ
Once ManageIQ is installed, you can log in and perform administration tasks.
Log in to ManageIQ for the first time after installing by:
-
Navigate to the URL for the login screen. (https://xx.xx.xx.xx on the virtual machine instance)
-
Enter the default credentials (Username: admin | Password: smartvm) for the initial login.
-
Click Login.
Changing the Default Login Password
Change your password to ensure more private and secure access to ManageIQ.
-
Navigate to the URL for the login screen. (https://xx.xx.xx.xx on the virtual machine instance)
-
Click Update Password beneath the Username and Password text fields.
-
Enter your current Username and Password in the text fields.
-
Input a new password in the New Password field.
-
Repeat your new password in the Verify Password field.
-
Click Login.
Appendix
Appliance Console Command-Line Interface (CLI)
Currently, the appliance_console_cli feature is a subset of the full functionality of the appliance_console itself, and covers functions most likely to be scripted by using the command-line interface (CLI).
-
After starting the ManageIQ appliance, log in with a user name of
rootand the default password ofsmartvm. This displays the Bash prompt for the root user. -
Enter the
appliance_console_cliorappliance_console_cli --helpcommand to see a list of options available with the command, or simply enterappliance_console_cli --option <argument>directly to use a specific option.
Database Configuration Options
| Option | Description |
| –region (-r) | region number (create a new region in the database - requires database credentials passed) |
| –internal (-i) | internal database (create a database on the current appliance) |
| –dbdisk | database disk device path (for configuring an internal database) |
| –hostname (-h) | database hostname |
| –port | database port (defaults to 5432) |
| –username (-U) | database username (defaults to root) |
| –password (-p) | database password |
| –dbname (-d) | database name (defaults to vmdb_production) |
v2_key Options
| Option | Description |
| –key (-k) | create a new v2_key |
| –fetch-key (-K) | fetch the v2_key from the given host |
| –force-key (-f) | create or fetch the key even if one exists |
| –sshlogin | ssh username for fetching the v2_key (defaults to root) |
| –sshpassword | ssh password for fetching the v2_key |
IPA Server Options
| Option | Description |
| –host (-H) | set the appliance hostname to the given name |
| –ipaserver (-e) | IPA server FQDN |
| –ipaprincipal (-n) | IPA server principal (default: admin) |
| –ipapassword (-w) | IPA server password |
| –ipadomain (-o) | IPA server domain (optional). Will be based on the appliance domain name if not specified. |
| –iparealm (-l) | IPA server realm (optional). Will be based on the domain name of the ipaserver if not specified. |
| –uninstall-ipa (-u) | uninstall IPA client |
Note:
-
In order to configure authentication through an IPA server, in addition to using Configure External Authentication (httpd) in the
appliance_console, external authentication can be optionally configured via theappliance_console_cli(command-line interface). -
Specifying –host will update the hostname of the appliance. If this step was already performed via the
appliance_consoleand the necessary updates that are made to/etc/hostsif DNS is not properly configured, the –host option can be omitted.
Certificate Options
| Option | Description |
| –ca (-c) | CA name used for certmonger (default: ipa) |
| –postgres-client-cert (-g) | install certs for postgres client |
| –postgres-server-cert | install certs for postgres server |
| –http-cert | install certs for http server (to create certs/httpd* values for a unique key) |
| –extauth-opts (-x) | external authentication options |
Note: The certificate options augment the functionality of the certmonger tool and enable creating a certificate signing request (CSR), and specifying certmonger the directories to store the keys.
Other Options
| Option | Description |
| –logdisk (-l) | log disk path |
| –tmpdisk | initialize the given device for temp storage (volume mounted at /var/www/miq_tmp) |
| –verbose (-v) | print more debugging info |
Example Usage.
$ ssh root@appliance.test.company.com
To create a new database locally on the server by using /dev/sdb:
# appliance_console_cli --internal --dbdisk /dev/sdb --region 0 --password smartvm
To copy the v2_key from a host some.example.com to local machine:
# appliance_console_cli --fetch-key some.example.com --sshlogin root --sshpassword smartvm
You could combine the two to join a region where db.example.com is the appliance hosting the database:
# appliance_console_cli --fetch-key db.example.com --sshlogin root --sshpassword smartvm --hostname db.example.com --password mydatabasepassword
To configure external authentication:
# appliance_console_cli --host appliance.test.company.com
                        --ipaserver ipaserver.test.company.com
                        --ipadomain test.company.com
                        --iparealm TEST.COMPANY.COM
                        --ipaprincipal admin
                        --ipapassword smartvm1
To uninstall external authentication:
# appliance_console_cli --uninstall-ipa