- High Availability Guide
- Environment Overview
- Installing the Appliances
- Configuring Database Failover
- Configuring the HAProxy Load Balancer
- Scaling a Highly Available ManageIQ Environment
- Updating a Highly Available ManageIQ Environment
- Updating Hostnames on Database-Only Appliances
High Availability Guide
Environment Overview
Learn how to configure and manage database high availability in a ManageIQ environment. This configuration allows for disaster mitigation: a failure in the primary database does not result in downtime, as the standby database takes over the failed database’s processes. This is made possible by database replication between two or more database servers. In ManageIQ, these servers are database-only ManageIQ appliances, which do not have evmserverd processes that are enabled. This is configured from the appliance_console menu at the time of deployment.
Two types of appliances that are used in high availability:
-
Database-only ManageIQ appliances, which do not have
evmserverdprocesses that are enabled or a user interface. -
Non-database ManageIQ appliances, which are standard appliances that contain a user interface and which have
evmserverdprocesses that are enabled.
In this configuration, a failover monitor daemon is configured and running on each non-database ManageIQ appliance. The failover monitor watches the repmgr metadata about the database-only appliances present in the cluster. When the primary database-only appliance goes down, the non-database ManageIQ appliances start polling each of the configured standby database-only appliances to monitor which one comes up as the new primary. The promotion is orchestrated either by repmgrd on the database-only appliances or is done manually. When the non-database ManageIQ appliances find that a standby has been promoted, ManageIQ reconfigures the setup by writing the new IP address in the database.yml file to point to the new primary.
Note:
Manual steps are required to reintroduce the failed database node back as the standby server. See Reintroducing the Failed Node.
Note, this procedure also does not provide scalability or a multi-master database setup. While a ManageIQ environment is comprised of an engine tier and a database tier, this configuration affects only the database tier and does not provide load balancing for the appliances.
Requirements
For a high availability ManageIQ environment, you need a virtualization host containing at minimum four virtual machines with ManageIQ installed, consisting of:
-
One virtual machine for the primary external database containing a minimum of 4 GB dedicated disk space
-
One virtual machine for the standby external database containing a minimum of 4 GB dedicated disk space
-
Two virtual machines for the non-database ManageIQ appliances
The database-only appliances must reside on a highly reliable local network in the same location.
Important:
It is essential to use the same ManageIQ appliance template version to install each virtual machine in this environment.
Correct time synchronization is required before installing the cluster. After installing the appliances, configure time synchronization on all appliances by using chronyd.
Installing the Appliances
This chapter outlines the steps for installing and configuring the ManageIQ components needed for high availability: a database cluster comprised of primary and standby database-only appliances, and two (at minimum) non-database ManageIQ appliances.
Installing the Primary Database-Only Appliance
The primary database-only appliance functions as an external database to the non-database ManageIQ appliances.
-
Deploy a ManageIQ appliance with an extra (and unpartitioned) disk for the database at a size appropriate for your deployment. For recommendations on disk space, see Database Requirements in the Deployment Planning Guide.
-
Configure time synchronization on the appliance by editing
/etc/chrony.confwith valid NTP server information. -
From your host environment, open the appliance and configure the network:
-
Log in to the appliance and run the
appliance_consolecommand to access the appliance console menu. -
Configure networking as desired by selecting the Set DHCP Network Configuration or Set Static Network Configuration option.
-
-
Resynchronize time information across the appliances:
# systemctl enable chronyd.service # systemctl start chronyd.service -
In the appliance console, configure the following:
-
Configure the hostname by selecting Set Hostname.
-
Select Configure Application.
-
Select Create key to create the encryption key. You can create a new key, or use an existing key on your system by selecting Fetch key from remote machine and following the prompts.
-
Select Create Internal Database.
-
Select the database disk. ManageIQ then activates the configuration.
-
For Should this appliance run as a standalone database server?, select
y. Selecting this option configures this appliance as a database-only appliance, and therefore the MIQ application andevmserverdprocesses will not run. This is required in highly available database deployments.Warning:
This configuration is not reversible.
-
Create the database password.
-
Note:
Do not create a region at this stage in the procedure.
You have now created the empty database.
You can check the configuration on the appliance console details screen.
If configured successfully, Local Database Server shows as running
(primary).
Running the psql vmdb_production command also provides information
about the database.
Installing the First ManageIQ Appliance
Install and configure a ManageIQ appliance to point to the primary database server. You can then create a database region and configure the primary database. This appliance does not serve as a database server.
After installing and configuring an empty database-only appliance in Installing the Primary Database-Only Appliance, the steps in this section create the database schema used by ManageIQ on the primary database-only appliance, and populate the database with the initial data.
-
Deploy a ManageIQ appliance. There is no requirement for an extra disk on this appliance.
-
Configure time synchronization on the appliance by editing
/etc/chrony.confwith valid NTP server information. -
From your host environment, open the appliance and configure the network:
-
Log in to the appliance and run the
appliance_consolecommand to access the appliance console menu. -
Configure networking as desired by selecting the Set DHCP Network Configuration or Set Static Network Configuration option.
-
-
Re-synchronize time information across the appliances:
# systemctl enable chronyd.service # systemctl start chronyd.service -
In the appliance console, configure the following:
-
Configure the hostname by selecting Set Hostname.
-
Select Configure Application.
-
Configure this appliance to use the encryption key from the primary database-only appliance:
-
For Encryption Key, select Fetch key from remote machine.
-
Enter the hostname for the primary database-only appliance you previously configured containing the encryption key.
-
Enter the primary database-only appliance’s username.
-
Enter the primary database-only appliance’s password.
-
Enter the path of the remote encryption key. (For example,
/var/www/miq/vmdb/certs/v2_key.)All appliances in the same region must use the same v2 key.
-
-
Configure the database:
-
Select Create Region in External Database, since the database is external to the appliances.
Creating a database region will destroy any existing data and cannot be undone. -
Assign a unique database region number.
-
Enter the port number.
-
For Are you sure you want to continue? Select
y.
-
-
Enter the primary database-only appliance’s name and access details:
-
Enter the hostname for the primary database-only appliance.
-
Enter a name to identify the database.
-
Enter the primary database-only appliance’s username.
-
Enter a password for the database and confirm the password.
-
-
This initializes the database, which takes a few minutes.
You can check the configuration on the appliance console details screen.
When configured successfully, MIQ Server will
show as running, and MIQ Database will show
the hostname of the primary database-only appliance.
Configuring the Primary Database-Only Appliance
On the primary database-only appliance you created in Installing the Primary Database-Only Appliance, initialize the nodes in the database cluster to configure the database replication. Run these steps from the appliance console:
-
In the appliance console menu, select Configure Database Replication.
-
Select Configure Server as Primary.
-
Set a unique identifier number for the server and enter the database name and credentials:
-
Select a number to uniquely identify the node in the replication cluster.
-
Enter the name of the database you configured previously.
-
Enter the cluster database username.
-
Enter the cluster database password and confirm the password.
-
Enter the primary database-only appliance hostname or IP address.
Note:
The hostname must be visible to all appliances that communicate with this database, including the non-database ManageIQ appliances and any global region databases.
-
Confirm that the replication server configuration details are correct, and select
yto apply the configuration.
-
This configures database replication in the cluster.
Installing the Standby Database-Only Appliance
The standby database-only appliance is a copy of the primary database-only appliance and takes over the role of primary database in case of failure.
Follow these steps to create a new standby appliance, or to add another standby appliance to the cluster.
-
Deploy a ManageIQ appliance with an extra (and unpartitioned) disk for the database that is the same size as the primary database-only appliance, as it will contain the same data. For recommendations on disk space, see Database Requirements in the Deployment Planning Guide.
-
Configure time synchronization on the appliance by editing
/etc/chrony.confwith valid NTP server information. -
From your host environment, open the appliance and configure the network:
-
Log in to the appliance and run the
appliance_consolecommand to access the appliance console menu. -
Configure networking as desired by selecting the Set DHCP Network Configuration or Set Static Network Configuration option.
-
-
Re-synchronize time information across the appliances:
# systemctl enable chronyd.service # systemctl start chronyd.service -
In the appliance console, configure the hostname by selecting Set Hostname.
You can now configure this appliance as a standby database-only appliance in the cluster.
Configuring the Standby Database-Only Appliance
The steps to configure the standby database-only appliance are similar to that of the primary database-only appliance, in that they prepare the appliance to be database-only, but as the standby.
On the standby database-only appliance, configure the following from the appliance console:
-
In the appliance console menu, select Configure Database Replication.
-
Select Configure Server as Standby.
-
Select the database disk. ManageIQ then activates the configuration.
-
Set a unique identifier number for the standby server and enter the database name and credentials:
-
Select a number to uniquely identify the node in the replication cluster.
-
Enter the cluster database name.
-
Enter the cluster database username.
-
Enter and confirm the cluster database password.
-
Enter the primary database-only appliance hostname or IP address.
-
Enter the standby database-only appliance hostname or IP address.
Note:
The hostname must be visible to all appliances that communicate with this database, including the engine appliances and any global region databases.
-
Select
yto configure the replication manager for automatic failover. -
Confirm that the replication standby server configuration details are correct, and select
yto apply the configuration.
-
The standby server will then run an initial synchronization with the primary database, and start locally in standby mode. This takes a few minutes.
Verify the configuration on the appliance console details screen for the
standby server. When configured successfully, Local Database Server
shows as running (standby).
Installing Additional ManageIQ Appliances
Install a second virtual machine with a ManageIQ appliance and any additional appliances in the region using the following steps:
-
Deploy a ManageIQ appliance. There is no requirement for an extra disk on this appliance.
-
Configure time synchronization on the appliance by editing
/etc/chrony.confwith valid NTP server information. -
From your host environment, open the appliance and configure the network:
-
Log in to the appliance and run the
appliance_consolecommand to access the appliance console menu. -
Configure networking as desired by selecting the Set DHCP Network Configuration or Set Static Network Configuration option.
-
-
Re-synchronize time information across the appliances:
# systemctl enable chronyd.service # systemctl start chronyd.service -
In the appliance console, configure the following:
-
Configure the hostname by selecting Set Hostname.
-
Select Configure Application.
-
Configure this appliance to use the encryption key from the primary database-only appliance:
-
For Encryption Key, select Fetch key from remote machine.
-
Enter the hostname for the primary database-only appliance you previously configured containing the encryption key.
-
Enter the port number.
-
Enter the primary database-only appliance’s username.
-
Enter the primary database-only appliance’s password.
-
Enter the path of the remote encryption key. (For example,
/var/www/miq/vmdb/certs/v2_key.) -
Select Join Region in External Database from the appliance console menu.
-
-
Enter the primary database-only appliance’s name and access details:
-
Enter the hostname for the primary database-only appliance.
-
Enter a name to identify the database.
-
Enter the primary database-only appliance’s username.
-
Enter a password for the database and confirm the password.
-
-
This configuration takes a few minutes to process.
You can check the configuration on the appliance console details screen.
When configured successfully, MIQ Server will
show as running, and MIQ Database will show
the hostname of the primary database-only appliance.
Configuring Database Failover
The failover monitor daemon must run on all of the non-database ManageIQ appliances to check for failures. In case of a database failure, it modifies the database configuration accordingly.
Failover Configuration Settings
Configuration settings are located in
/var/www/miq/vmdb/config/ha_admin.yml.
Default settings:
| Parameter | Default Value | Description |
|---|---|---|
failover_attempts |
10 | The number of times the failover_monitor will attempt to failover after discovering the connection to the current database is no longer active. |
db_check_frequency |
120s | The sleep interval in the monitor loop, it defines how frequently the connection to the database is checked. |
failover_check_frequency |
60s | The sleep interval between attempting to failover additional times. |
Note:
failover_attempts and failover_check_frequency determine the time
limit for the cluster to elect a new primary. To produce quicker
failovers, reduce the value for failover_check_frequency and increase
the value for failover_attempts.
Configuring the Failover Monitor
Configure the failover monitor only on the non-database ManageIQ appliances with the following steps:
-
In the appliance console menu, select Configure Application Database Failover Monitor.
-
Select Start Database Failover Monitor.
Testing Database Failover
Test that failover is working correctly between your databases with the following steps:
-
Simulate a failure by stopping the database on the primary server:
# systemctl stop postgresql.service -
To check the status of the database, run:
# systemctl status postgresql.serviceNote:
You can check the status of the simulated failure by viewing the evm log on the engine appliances with
journalctl -t evm. -
Check the appliance console summary screen for the primary database. If configured correctly, the MIQ Database value in the appliance console summary should have switched from the hostname of the old primary database to the hostname of the new primary on all ManageIQ appliances.
Reintroducing the Failed Node
Manual steps are required to reintroduce the failed primary database node back into the cluster as a standby. This allows for greater control over the configuration, and to diagnose the failure.
To reintroduce the failed node, reinitialize the standby database. On the standby database-only appliance, configure the following:
-
In the appliance console menu, select Configure Database Replication.
-
Select Configure Server as Standby.
-
Select
yto remove all previous data from the server and configure it as a new standby database. -
Set a unique identifier number for the standby server and enter the database name and credentials:
-
Select a number to uniquely identify the node in the replication cluster. This number can be the same as the node’s original identification number.
-
Enter the cluster database name.
-
Enter the cluster database username.
-
Enter the cluster database password.
-
Enter the new primary database-only appliance hostname or IP address.
-
Enter the new standby database-only appliance hostname or IP address.
Note:
The hostname must be visible to all appliances that communicate with this database, including the engine appliances and any global region databases.
-
Select
yto configure the replication manager for automatic failover.Note:
If re-using the node’s identification number, select
yto overwrite the existing node ID (this cannot be undone). Additionally, selectyto overwrite and reconfigure the replication settings in/etc/repmgr/*/repmgr.confwhen prompted. -
Confirm that the replication standby server configuration details are correct, and select
yto apply the configuration.
-
The standby server will then run an initial synchronization with the primary database, and start locally in standby mode.
Verify the configuration on the appliance console details screen for the
standby server. When configured successfully, Local Database Server
shows as running (standby).
Your ManageIQ environment is now re-configured for high availability.
Configuring the HAProxy Load Balancer
After configuring the appliances as described in Installing the Appliances, configure a load balancer to direct traffic to the non-database ManageIQ appliances.
The following steps highlight the configuration requirements for the load balancer, which in this case is HAProxy. The load balancer is assigned a virtual IP address for the ManageIQ user interface and is pointed to one of the many non-database ManageIQ appliances behind the load balancer in a round robin fashion.
Additionally, to avoid the HAProxy server being a single point of
failure, two redundant HAProxy servers are configured in active-passive
mode. The failover is orchestrated by using the keepalived daemon.
keepalived monitors the health of the active load balancer and in case
of a failure, the virtual IP is failed over to the passive load
balancer, which then becomes active. The virtual IP is configured
by`keepalived`.
The virtual IP is the single IP address that is used as the point of access to the ManageIQ appliance user interfaces and is configured in the HAProxy configuration along with a load balancer profile. When an end user accesses the virtual IP, it directs traffic to the appropriate ManageIQ appliance based on the configured HAProxy policy.
Note:
Additional configuration is required to run HAProxy on Red Hat OpenStack Platform. See the OpenStack Networking Guide for more information.
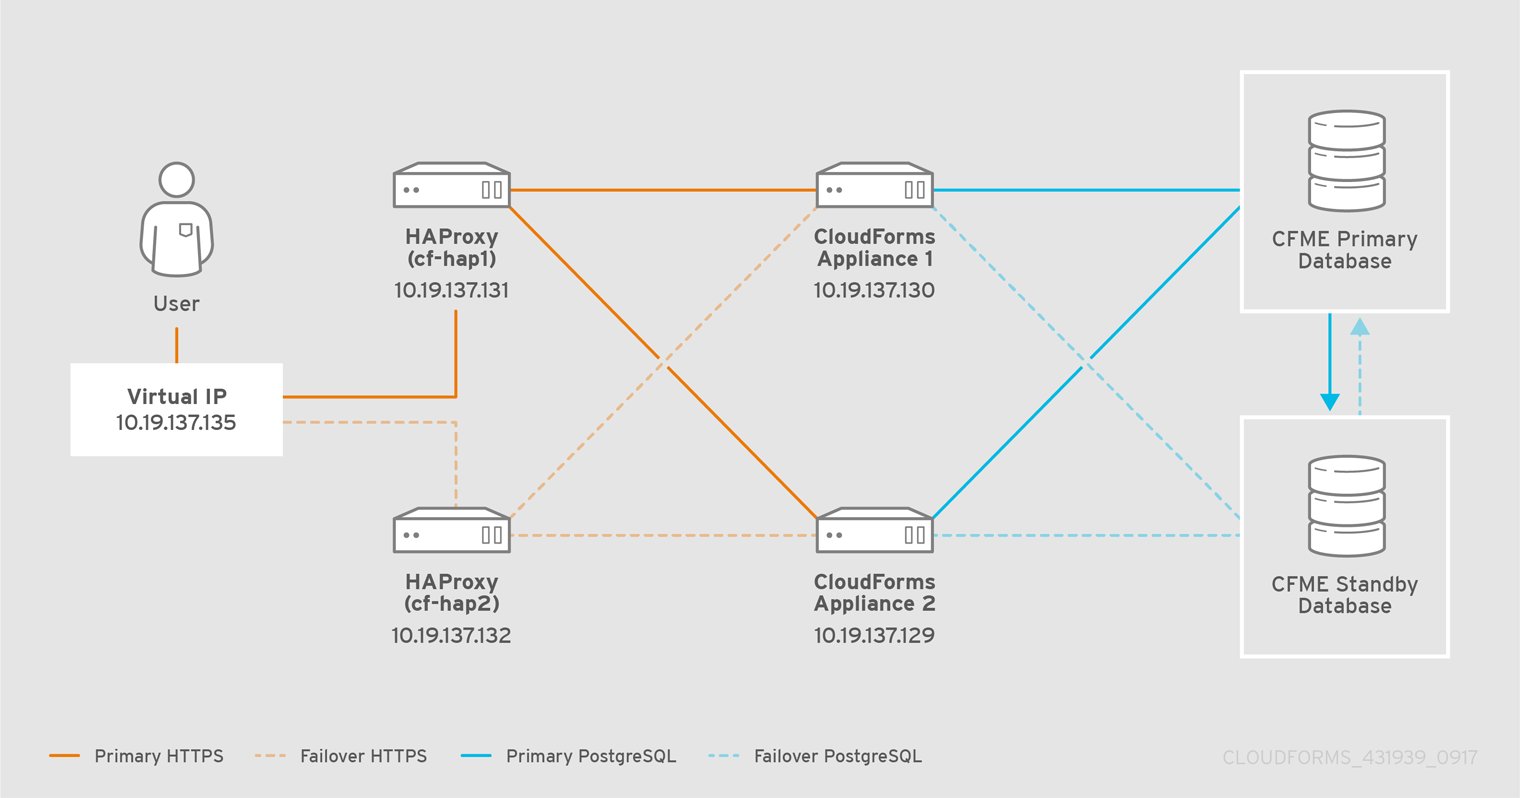
This configuration uses two HAProxy servers and a virtual IP (configured by keepalived). The following example procedure uses the following IP addresses and names; substitute values for your environment as needed:
-
HAProxy1: 10.19.137.131 (cf-hap1.example.com)
-
HAProxy2: 10.19.137.132 (cf-hap2.example.com)
-
Virtual IP (to be configured by
keepalived): 10.19.137.135 (cf-ha.example.com) -
MIQ Appliance 1: 10.19.137.130 (cfme1.example.com)
-
MIQ Appliance 2: 10.19.137.129 (cfme2.example.com)
The following diagram shows the HAProxy configuration in this procedure:
To configure HAProxy load balancing:
-
Install two servers (virtual or physical) running Red Hat Enterprise Linux 7.2 or above, to be used as the HAProxy servers.
-
Configure subscriptions on both HAProxy servers (
cf-hap1andcf-hap2) so that therhel-7-server-rpmsrepository is enabled:[root@cf-hap1 ~]# subscription-manager repos --list-enabled +-------------------------------------------+ Available Repositories in /etc/yum.repos.d/redhat.repo +-------------------------------------------+ Repo Name: Red Hat Enterprise Linux Server 7 Server (RPMs) Repo ID: rhel-7-server-rpms Repo URL: https://cdn.redhat.com/content/dist/rhel/server/7/$release/$basearch/os Enabled: 1 [root@cf-hap2 ~]# subscription-manager repos --list-enabled +-------------------------------------------+ Available Repositories in /etc/yum.repos.d/redhat.repo +-------------------------------------------+ Repo Name: Red Hat Enterprise Linux Server 7 Server (RPMs) Repo ID: rhel-7-server-rpms Repo URL: https://cdn.redhat.com/content/dist/rhel/server/7/$release/$basearch/os Enabled: 1 -
Configure the firewall on both HAProxy servers.
-
On the
cf-hap1server, run the following:Note:
keepaliveduses VRRP (Virtual Redundancy Router Protocol) to monitor the servers and determine which node is the master and which node is the backup. VRRP communication between routers uses multicast IPv4 address 224.0.0.18 and IP protocol number 112.[root@cf-hap1 ~]# firewall-cmd --permanent --add-port=80/tcp --add-port=443/tcp --add-port=8443/tcp && firewall-cmd --reload [root@cf-hap1 ~]# firewall-cmd --direct --permanent --add-rule ipv4 filter INPUT 0 \ --in-interface eth0 --destination 224.0.0.18 --protocol vrrp -j ACCEPT [root@cf-hap1 ~]#firewall-cmd --direct --permanent --add-rule ipv4 filter OUTPUT 0 \ --out-interface eth0 --destination 224.0.0.18 --protocol vrrp -j ACCEPT [root@cf-hap1 ~]# firewall-cmd --reload -
On the
cf-hap2server, repeat the same commands by running the following:[root@cf-hap2 ~]# firewall-cmd --permanent --add-port=80/tcp --add-port=443/tcp --add-port=8443/tcp && firewall-cmd --reload [root@cf-hap2 ~]# firewall-cmd --direct --permanent --add-rule ipv4 filter INPUT 0 \ --in-interface eth0 --destination 224.0.0.18 --protocol vrrp -j ACCEPT [root@cf-hap2 ~]# firewall-cmd --direct --permanent --add-rule ipv4 filter OUTPUT 0 \ --out-interface eth0 --destination 224.0.0.18 --protocol vrrp -j ACCEPT [root@cf-hap2 ~]# firewall-cmd --reload
-
-
Install and configure
keepalivedon both servers.-
On the
cf-hap1server, run the following:[root@cf-hap1 ~]# yum install keepalived -y [root@cf-hap1 ~]# cat /etc/keepalived/keepalived.conf vrrp_script chk_haproxy { script "killall -0 haproxy" # check the haproxy process interval 2 # every 2 seconds weight 2 # add 2 points if OK } vrrp_instance VI_1 { interface eth0 # interface to monitor state MASTER # MASTER on haproxy1, BACKUP on haproxy2 virtual_router_id 51 priority 101 # 101 on haproxy1, 100 on haproxy2 virtual_ipaddress { 10.19.137.135/21 # virtual ip address } track_script { chk_haproxy } } -
On the
cf-hap2server, run the following:[root@cf-hap2 ~]# yum install keepalived -y [root@cf-hap2 ~]# cat /etc/keepalived/keepalived.conf vrrp_script chk_haproxy { script "killall -0 haproxy" # check the haproxy process interval 2 # every 2 seconds weight 2 # add 2 points if OK } vrrp_instance VI_1 { interface eth0 # interface to monitor state BACKUP # MASTER on haproxy1, BACKUP on haproxy2 virtual_router_id 51 priority 100 # 101 on haproxy1, 100 on haproxy2 virtual_ipaddress { 10.19.137.135/21 # virtual ip address } track_script { chk_haproxy } } -
On both servers, configure IP forwarding and non-local binding by appending the following to the
sysctl.conffile. In order for thekeepalivedservice to forward network packets properly to the real servers, each router node must have IP forwarding turned on in the kernel. On thecf-hap1server, run the following:[root@cf-hap1 ~]# cat /etc/sysctl.conf # System default settings live in /usr/lib/sysctl.d/00-system.conf. # To override those settings, enter new settings here, or in an /etc/sysctl.d/<name>.conf file # # For more information, see sysctl.conf(5) and sysctl.d(5). net.ipv4.ip_forward = 1 net.ipv4.ip_nonlocal_bind = 1 -
On the
cf-hap2server, run the following:[root@cf-hap2 ~]# cat /etc/sysctl.conf # System default settings live in /usr/lib/sysctl.d/00-system.conf. # To override those settings, enter new settings here, or in an /etc/sysctl.d/<name>.conf file # # For more information, see sysctl.conf(5) and sysctl.d(5). net.ipv4.ip_forward = 1 net.ipv4.ip_nonlocal_bind = 1 -
Verify that the
sysctl.confsettings were saved on each server:[root@cf-hap1 ~]# sysctl -p net.ipv4.ip_forward = 1 net.ipv4.ip_nonlocal_bind = 1 [root@cf-hap2 ~]# sysctl -p net.ipv4.ip_forward = 1 net.ipv4.ip_nonlocal_bind = 1
-
-
Install HAProxy on both servers:
[root@cf-hap1 ~]# yum install haproxy -y [root@cf-hap2 ~]# yum install haproxy -y -
Configure the appropriate IPs for load balancing on the
cf-hap1server as follows:[root@cf-hap1 ~]# cat /etc/haproxy/haproxy.cfg global log 127.0.0.1 local0 chroot /var/lib/haproxy pidfile /var/run/haproxy.pid maxconn 4000 user haproxy group haproxy daemon defaults mode http log global option httplog option dontlognull option http-server-close option forwardfor except 127.0.0.0/8 option redispatch retries 3 timeout http-request 10s timeout queue 1m timeout connect 10s timeout client 1m timeout server 1m timeout http-keep-alive 10s timeout check 10s # ManageIQ Management UI URL listen apache bind 10.19.137.135:80 mode tcp balance source server cfme1 10.19.137.130:80 check inter 1s server cfme2 10.19.137.129:80 check inter 1s # listen apache-443 bind 10.19.137.135:443 mode tcp balance source server cfme1 10.19.137.130:443 check inter 1s server cfme2 10.19.137.129:443 check inter 1s # listen apache-8443 bind 10.19.137.135:8443 mode tcp balance source server cfme1 10.19.137.130:8443 check inter 1s server cfme2 10.19.137.129:8443 check inter 1sNote:
-
The virtual IP in this configuration is 10.19.137.135 (cf-haproxy.example.com).
-
The IP of MIQ Appliance 1 is 10.19.137.130 (cfme1.example.com).
-
The IP of MIQ Appliance 2 is 10.19.137.129 (cfme2.example.com).
-
-
Configure the appropriate IPs for load balancing on the
cf-hap2server as well:[root@cf-hap2 ~]# cat /etc/haproxy/haproxy.cfg global log 127.0.0.1 local0 chroot /var/lib/haproxy pidfile /var/run/haproxy.pid maxconn 4000 user haproxy group haproxy daemon defaults mode http log global option httplog option dontlognull option http-server-close option forwardfor except 127.0.0.0/8 option redispatch retries 3 timeout http-request 10s timeout queue 1m timeout connect 10s timeout client 1m timeout server 1m timeout http-keep-alive 10s timeout check 10s # ManageIQ Management UI URL listen apache bind 10.19.137.135:80 mode tcp balance source server cfme1 10.19.137.130:80 check inter 1s server cfme2 10.19.137.129:80 check inter 1s # listen apache-443 bind 10.19.137.135:443 mode tcp balance source server cfme1 10.19.137.130:443 check inter 1s server cfme2 10.19.137.129:443 check inter 1s # listen apache-8443 bind 10.19.137.135:8443 mode tcp balance source server cfme1 10.19.137.130:8443 check inter 1s server cfme2 10.19.137.129:8443 check inter 1s -
On each server, start the
keepalivedandhaproxyservices:[root@cf-hap1~]# systemctl enable keepalived [root@cf-hap1~]# systemctl start keepalived [root@cf-hap1~]# systemctl enable haproxy [root@cf-hap1~]# systemctl start haproxy [root@cf-hap2~]# systemctl enable keepalived [root@cf-hap2~]# systemctl start keepalived [root@cf-hap2~]# systemctl enable haproxy [root@cf-hap2~]# systemctl start haproxy
Verifying the HAProxy Configuration
Verify the HAProxy configuration by inspecting the following:
On the master node (cf-hap1):
[root@cf-hap1 ~]# ip addr show dev eth0
2: eth0: <BROADCAST,MULTICAST,UP,LOWER_UP> mtu 1500 qdisc pfifo_fast state UP qlen 1000
    link/ether 00:01:a4:ac:32:4e brd ff:ff:ff:ff:ff:ff
    inet 10.19.137.131/21 brd 10.19.143.255 scope global eth0
       valid_lft forever preferred_lft forever
    inet 10.19.137.135/21 scope global eth0
       valid_lft forever preferred_lft forever
    inet6 2620:52:0:1388:201:a4ff:feac:324e/64 scope global mngtmpaddr dynamic
       valid_lft 2591800sec preferred_lft 604600sec
    inet6 fe80::201:a4ff:feac:324e/64 scope link
       valid_lft forever preferred_lft forever
On the backup node (cf-hap2):
[root@cf-hap2 ~]# ip addr show dev eth0
2: eth0: <BROADCAST,MULTICAST,UP,LOWER_UP> mtu 1500 qdisc pfifo_fast state UP qlen 1000
    link/ether 00:01:a4:ac:33:a6 brd ff:ff:ff:ff:ff:ff
    inet 10.19.137.132/21 brd 10.19.143.255 scope global eth0
       valid_lft forever preferred_lft forever
    inet6 2620:52:0:1388:201:a4ff:feac:33a6/64 scope global noprefixroute dynamic
       valid_lft 2591982sec preferred_lft 604782sec
    inet6 fe80::201:a4ff:feac:33a6/64 scope link
       valid_lft forever preferred_lft forever
Notice the virtual IP 10.19.137.135 has been started by keepalived
(VRRP).
Simulate a failure on the master node:
[root@cf-hap1 ~]# systemctl stop keepalived
Notice the virtual IP failover on the master node (cf-hap1):
[root@cf-hap1 ~]# ip addr show dev eth0
2: eth0: <BROADCAST,MULTICAST,UP,LOWER_UP> mtu 1500 qdisc pfifo_fast state UP qlen 1000
    link/ether 00:01:a4:ac:32:4e brd ff:ff:ff:ff:ff:ff
    inet 10.19.137.131/21 brd 10.19.143.255 scope global eth0
       valid_lft forever preferred_lft forever
    inet6 2620:52:0:1388:201:a4ff:feac:324e/64 scope global mngtmpaddr dynamic
       valid_lft 2591800sec preferred_lft 604600sec
    inet6 fe80::201:a4ff:feac:324e/64 scope link
       valid_lft forever preferred_lft forever
The backup node (cf-hap2) shows the following:
[root@cf-hap2 ~]# ip addr show dev eth0
2: eth0: <BROADCAST,MULTICAST,UP,LOWER_UP> mtu 1500 qdisc pfifo_fast state UP qlen 1000
    link/ether 00:01:a4:ac:33:a6 brd ff:ff:ff:ff:ff:ff
    inet 10.19.137.132/21 brd 10.19.143.255 scope global eth0
       valid_lft forever preferred_lft forever
    inet 10.19.137.135/21 scope global eth0
       valid_lft forever preferred_lft forever
    inet6 2620:52:0:1388:201:a4ff:feac:33a6/64 scope global noprefixroute dynamic
       valid_lft 2591982sec preferred_lft 604782sec
    inet6 fe80::201:a4ff:feac:33a6/64 scope link
       valid_lft forever preferred_lft forever
Your environment is now configured for high availability.
Scaling a Highly Available ManageIQ Environment
After creating high availability for the database tier and the user interface tier, the rest of the infrastructure should be sized appropriately for the roles and the environments that they manage. These roles and tiers use built-in high availability mechanisms like primary, secondary, and tertiary failover.
You can configure additional worker appliances as needed using the steps in Installing Additional Appliances, and then assign zones and server roles. The non-database ManageIQ appliances and roles can be configured in any order.
The following diagram shows an example of a highly available database configuration that contains worker appliances, providers, and the HAProxy load balancer configured in Configuring the HAProxy Load Balancer.
The worker appliances in the diagram are labeled by server role (User Interface, Management, and Database Ops) and corresponding zone to show how a highly available environment might be scaled with server roles and zones.
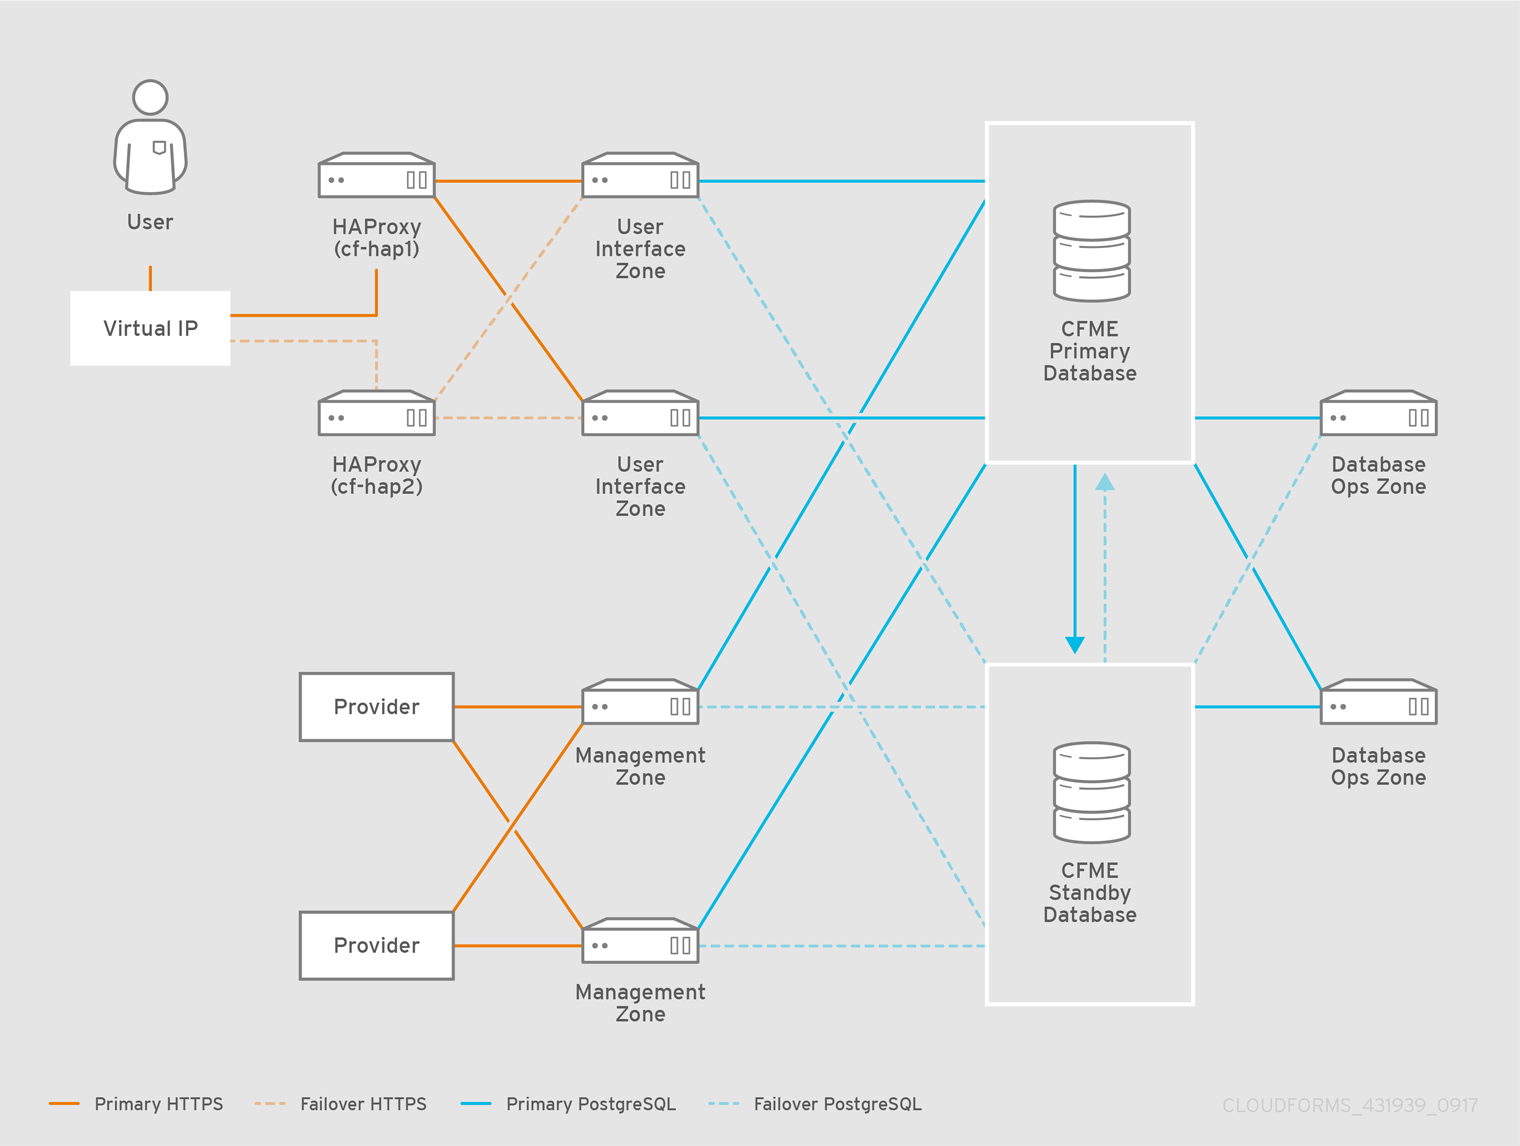
See Regions and Servers in General Configuration for more information on configuring servers and roles.
Updating a Highly Available ManageIQ Environment
Applying software package minor updates (referred to as errata) to appliances in a high availability environment must be performed in a specific order to avoid migrating your databases to the next major ManageIQ version.
Prerequisites.
Ensure each appliance is registered to Red Hat Subscription Manager and subscribed to the update channels required by ManageIQ in order to access updates.
To verify if your appliance is registered and subscribed to the correct update channels, run:
# yum repolist
Appliances must be subscribed to the following channels:
-
{product-repo_cfme}
-
{product-repo_ansible}
-
{product-repo_extras}
-
{product-repo_optional}
-
{product-repo_server}
Updating the Appliances.
Follow this procedure to update appliances in your environment without migrating the database to the next major version of ManageIQ. Note the appliance to perform each step on: some steps are to be performed only on the database-only appliances, and other steps only on the non-database ManageIQ appliances, while some steps apply to all appliances.
-
Power off the non-database ManageIQ appliances.
-
Power off the database-only appliances.
-
Back up each appliance:
-
Back up the database of your appliance. Take a snapshot if possible.
-
Back up the following files for disaster recovery, noting which appliance each comes from:
-
/var/www/miq/vmdb/GUID -
/var/www/miq/vmdb/REGION
-
-
Note the hostnames and IP addresses of each appliance. This information is available on the summary screen of the appliance console.
-
-
Start each database-only appliance.
-
Start each non-database ManageIQ appliance again, and stop
evmserverdon each just after boot:# systemctl stop evmserverd -
Apply updates by running the following on each appliance:
# yum update -
On one of the non-database ManageIQ appliances, apply any database schema updates included in the errata, and reset the Red Hat and ManageIQ automation domains:
# vmdb # rake db:migrate # rake evm:automate:reset -
Power off the non-database ManageIQ appliances.
-
Reboot the database-only appliances.
-
Wait five minutes, then start the non-database ManageIQ appliances again.
The appliances in your high availability environment are now up to date.
Updating Hostnames on Database-Only Appliances
When updating the hostnames of database-only appliances in a cluster, you must also re-configure high availability on the primary and standby database-only appliances.
Preparing to Update Appliance Hostnames
Before updating the hostnames of your appliances, complete the following:
-
Note the hostnames of the active database (primary) appliance and the standby database appliances in the appliance console.
You can verify this from the appliance summary screen of a database-only appliance, where the status for Local Database Server shows primary or standby, for example:
... Local Database Server: running (primary) ... -
On the non-database ManageIQ appliances, stop the failover monitor:
-
In the appliance console menu, select Configure Application Database Failover Monitor.
-
Select Stop Database Failover Monitor.
-
-
On the standby database-only appliances, stop the
postgresqldatabase service:# systemctl stop postgresql.service -
Stop
evmserverdon each non-database ManageIQ appliance:# systemctl stop evmserverd
Updating the Primary Database-Only Appliance Hostname
Run the following steps on your primary database-only appliance:
-
In the appliance console menu, configure the new hostname or IP address from the Configure Network option.
-
Restart the appliance.
-
Update the
hostkey to the primary database appliance’s new hostname in/var/www/miq/vmdb/config/database.yml.
Updating the Standby Database-Only Appliance Hostname
Run the following steps on your standby database-only appliances:
-
In the appliance console menu, configure the new hostname or IP address from the Configure Network option.
-
Restart the appliance.
-
Update the
hostkey to the standby database appliance’s new hostname in/var/www/miq/vmdb/config/database.yml.
Repeat these steps on any additional standby database-only appliances.
Proceed to re-configure high availability on the primary and standby database-only appliances.
Re-configuring High Availability on Database-Only Appliances
Re-configure replication on the database-only appliances, and restart services on your cluster.
Configuring the Primary Database-Only Appliance
On the primary database-only appliance, initialize the nodes in the database cluster to re-configure the database replication:
-
In the appliance console menu, select Configure Database Replication.
-
Select Configure Server as Primary.
-
Set a unique identifier number for the server and enter the database name and credentials:
-
Select a number to uniquely identify the node in the replication cluster.
-
Enter the cluster database name.
-
Enter the cluster database username.
-
Enter the cluster database password and confirm the password.
-
Enter the new primary database-only appliance hostname or IP address.
Note:
The hostname or IP address must be visible to all appliances that communicate with this database, including the non-database ManageIQ appliances and any global region databases.
-
Confirm that the replication server configuration details are correct, and select
yto apply the configuration.
-
Configuring the Standby Database-Only Appliance
The steps to re-configure the standby database-only appliances are similar to that of the primary database-only appliance, in that they prepare the appliance to be database-only, but as the standby.
On the standby database-only appliances, configure the following:
-
In the appliance console menu, select Configure Database Replication.
-
Select Configure Server as Standby.
-
Select the database disk. ManageIQ then activates the configuration.
-
Set a unique identifier number for the standby server and enter the database name and credentials:
-
Select a number to uniquely identify the node in the replication cluster.
-
Enter the cluster database name.
-
Enter the cluster database username.
-
Enter the cluster database password.
-
Enter the new primary database-only appliance hostname or IP address.
-
Enter the new standby database-only appliance hostname or IP address.
Note:
The hostname or IP address must be visible to all appliances that communicate with this database, including the engine appliances and any global region databases.
-
Select
yto configure the replication manager for automatic failover. -
Confirm that the replication standby server configuration details are correct, and select
yto apply the configuration. The standby server will then run an initial synchronization with the primary database, and start locally in standby mode.
-
-
Verify the configuration on the appliance console details screen for the standby server. When configured successfully, Local Database Server shows as
running (standby).
Repeat these steps on any additional standby database-only appliances.
Restarting Services
-
Start
evmserverdon each non-database ManageIQ appliance:# systemctl start evmserverdAfter
evmserverdhas started successfully, all appliances will be able connect to the database. -
Restart the failover monitor on the non-database ManageIQ appliances:
-
In the appliance console menu, select Configure Application Database Failover Monitor.
-
Select Start Database Failover Monitor.
-
Note:
You can view a summary of the updated appliances by running repmgr cluster show on one of the database appliances.
Your ManageIQ environment is now re-configured for high availability.