- Integration with OpenShift Container Platform
- Overview
- Prerequisites
- Retrieving the OpenShift Container Platform Management Token
- Configuring ManageIQ
- Configuring ManageIQ Capacity and Utilization
- Adding OpenShift Container Platform as a Container Provider
- Container Image Scanning
- Configuring Image Scanning
- Scheduling A Recurring Scan
- Working with Images
- OpenSCAP Policy Profile
- Controlling OpenShift Pod Execution
- Reference
Integration with OpenShift Container Platform
Overview
This guide walks you through adding a Red Hat OpenShift Container Platform cluster to a ManageIQ container provider catalog. This deployment focuses on enabling the OpenShift Container Platform cluster metrics plug-in, so that ManageIQ can collect information from an OpenShift Container Platform cluster upon integration.
Each procedure in this guide is covered in greater detail in the ManageIQ and OpenShift Container Platform product documentation. However, links to the corresponding sections are provided for more detail.
The following sections will describe the required configuration for both products prior to integration.
Prerequisites
This guide assumes that you have:
When enabling metrics on OpenShift Container Platform, you can store your metrics data on persistent or non-persistent storage. To use persistent storage, you need to provision a persistent volume specifically for this purpose before configuring the metrics components. See Persistent Volumes in the OpenShift Container Platform Architecture documentation for more information.
Retrieving the OpenShift Container Platform Management Token
After enabling cluster metrics on your OpenShift Container Platform deployment, retrieve the management token while you are still logged in to the OpenShift Container Platform host. This will be required later in Adding OpenShift Container Platform as a Container Provider.
Run the following to obtain the token needed to add a Red Hat OpenShift provider:
- Create the service account token
oc apply -f - <<EOF apiVersion: v1 kind: Secret metadata: name: $service_account_name-secret namespace: $project_name annotations: kubernetes.io/service-account.name: $service_account_name type: kubernetes.io/service-account-token EOF -
Describe the secret to retrieve the full token value:
oc get secret -o template --template  -n $project_name $service_account_name-secret
eyJhbGciOiJSUzI1N...
Configuring ManageIQ
Configuring ManageIQ involves two steps:
These steps are required to allow ManageIQ to collect metrics from OpenShift Container Platform Enabling OpenShift Container Platform Metrics and use them to perform a SmartState analysis. You can choose different servers to perform either function; the following sections assume that you will.
Configuring ManageIQ Capacity and Utilization
For metrics collection to work properly, you also need to configure ManageIQ to allow for all three Capacity & Utilization server roles, which are available from the settings menu under Configuration > Server > Server Control.
To enable these server roles:
-
Click Configuration, then select the server to configure from menu: Settings > Zone in the accordion menu on the left.
-
Browse to the Server Roles list in the menu: Server > Server Control section. From there, set the required capacity and utilization roles to ON, namely:
-
Capacity & Utilization Coordinator
-
Capacity & Utilization Data Collector
-
Capacity & Utilization Data Processor
-
-
Click Save.
Data collection is enabled immediately. However, the first collection begins 5 minutes after the server is started, and every 10 minutes after that. Therefore, the longest the collection takes after enabling the Capacity & Utilization Collector role is 10 minutes. The first collection from a particular provider may take a few minutes since ManageIQ is gathering data points going one month back in time.
For more information, see Capacity and Utilization Collection in the Deployment Planning Guide.
Enabling SmartState Analysis
After enabling the required server roles, enable SmartState analysis. See Smart State Analysis Support from the Support Matrix.
Enabling SmartState analysis is similar to Assigning the Capacity and Utilization Server Roles, in that the procedure also involves enabling server roles on a specific server. To do so:
-
Click Configuration.
-
Select the server to configure from menu: Settings[Zone] in the left pane of the appliance.
-
Browse to the Server Roles list in the menu: Server > Server Control section. From there, set the appropriate SmartState roles to ON. Namely:
-
SmartProxy
-
SmartState Analysis
-
-
Click Save.
Adding OpenShift Container Platform as a Container Provider
At this point, you should now be ready to add your OpenShift cluster to ManageIQ as a container provider. To do so, prepare the token you retrieved in Retrieving the OpenShift Container Platform Management Token and follow the procedure below:
-
Browse to menu: Compute > Containers > Providers.
-
Click Configuration, then click
 (Add a New Containers Provider).
 -
Enter a Name for the provider.
-
From the Type list, select OpenShift Container Platform.
-
Enter the appropriate Zone for the provider. If you do not specify a zone, it is set to
default. -
In the Default tab, configure the following for the OpenShift provider:
-
Select a Security Protocol method to specify how to authenticate the provider:
-
SSL: Authenticate the provider securely using a trusted Certificate Authority. Select this option if the provider has a valid SSL certificate and it is signed by a trusted Certificate Authority. No further configuration is required for this option.
-
SSL trusting custom CA: Authenticate the provider with a self-signed certificate. For this option, copy your provider’s CA certificate to the Trusted CA Certificates box in PEM format.
Note:
You can obtain your OpenShift Container Platform provider’s CA certificate for all endpoints (default, metrics, alerts) from
/etc/origin/master/ca.crt. Paste the output (a block of text starting with-----BEGIN CERTIFICATE-----) into the Trusted CA Certificates field. -
SSL without validation: Authenticate the provider insecurely (not recommended).
-
-
Enter the Hostname (or IPv4 or IPv6 address) of the provider.
Important:
The Hostname must use a unique fully qualified domain name.
-
Enter the API Port of the provider. The default port is
6443. -
Enter a token for your provider in the Token box.
Note:
To obtain a token for your provider, run the
oc get secretcommand on your provider; see Obtaining an OpenShift Container Platform Management Token.For example:
# oc get secret –namespace management-infra management-admin-token-8ixxs –template=’’ | base64 –decode
-
Click Validate to confirm that ManageIQ can connect to the OpenShift Container Platform provider.
-
-
In the Metrics endpoint tab optionally configure the metrics service details:
-
Select a service type (e.g.: Prometheus) or leave disabled
-
Select a Security Protocol method to specify how to authenticate the service:
-
SSL: Authenticate the provider securely using a trusted Certificate Authority. Select this option if the provider has a valid SSL certificate and it is signed by a trusted Certificate Authority. No further configuration is required for this option.
-
SSL trusting custom CA: Authenticate the provider with a self-signed certificate. For this option, copy your provider’s CA certificate to the Trusted CA Certificates box in PEM format.
-
SSL without validation: Authenticate the provider insecurely using SSL. (Not recommended)
-
-
Enter the Hostname (or IPv4 or IPv6 address) of the metrics service.
In order to find the hostname you can use the
oc get routecommand.You can retrieve the Prometheus route by running:
oc get route prometheus-k8s -n openshift-monitoringExample:
oc get route prometheus-k8s -n openshift-monitoring
NAME             HOST/PORT                                            PATH             SERVICES  PORT      TERMINATION          WILDCARD
prometheus-k8s   prometheus-k8s-openshift-monitoring.ocp.example.com  prometheus-k8s   web       reencrypt/Redirect   None
In this example you would use
prometheus-k8s-openshift-monitoring.ocp.example.comas the metrics hostname. -
Enter the API Port of your metrics endpoint uses a non-standard port for access. The default port is
443. -
Click Validate to confirm that ManageIQ can connect to the metrics endpoint.
-
-
In the Virtualization endpoint tab optionally configure the virtualization service details:
-
Select a service type (OpenShift Virtualization) or leave disabled
-
Select a Security Protocol method to specify how to authenticate the service:
-
SSL: Authenticate the provider securely using a trusted Certificate Authority. Select this option if the provider has a valid SSL certificate and it is signed by a trusted Certificate Authority. No further configuration is required for this option.
-
SSL trusting custom CA: Authenticate the provider with a self-signed certificate. For this option, copy your provider’s CA certificate to the Trusted CA Certificates box in PEM format.
-
SSL without validation: Authenticate the provider insecurely using SSL. (Not recommended)
-
-
Enter the Hostname (or IPv4 or IPv6 address) of the virtualization service.
-
Enter the API Port of your virtualization service. The default port is
443. -
Enter a token for your provider in the Token box.
-
-
Click the Advanced tab to add image inspector settings for scanning container images on your provider using OpenSCAP.
Note:
-
These settings control downloading the image inspector container image from the registry and obtaining the Common Vulnerabilities and Exposures (CVE) information (for effective scanning) via a proxy.
-
CVE URL that ManageIQ requires to be open for OpenSCAP scanning: https://www.redhat.com/security/data/metrics/ds/. This information is based on the source code of OpenSCAP.
-
Enter the proxy information for the provider in either HTTP, HTTPS, or NO Proxy depending on your environment.
-
Enter the Image-Inspector Repository information. For example,
openshift3/image-inspector. -
Enter the Image-Inspector Registry information. For example,
registry.access.redhat.com. -
Enter the Image-Inspector Tag value. A tag is a mark used to differentiate images in a repository, typically by the application version stored in the image.
-
Enter
https://www.redhat.com/security/data/metrics/ds/in CVE location.
-
-
Click Add.
Note:
You can also set global default image-inspector settings for all
OpenShift providers in the advanced settings menu by editing the values
under ems_kubernetes, instead of setting this for each provider.
For example:
:image_inspector_registry: registry.access.redhat.com
:image_inspector_repository: openshift3/image-inspector
Container Image Scanning
Configuring Image Scanning
ManageIQ manages vulnerability scanning of container images. When an OpenShift provider is added, OpenShift images from the internal registry are discovered. To enable image scanning, perform the following configuration steps:
-
Browse to menu: Compute > Containers > Providers.
-
Select the checkboxes of the OpenShift providers on which to enable scanning.
-
From the Policy pull-down menu, click Manage Policies.
-
Select the OpenSCAP profile checkbox.
-
Click Save.
This action will trigger a SmartState analysis, or scan, of all images referenced by the OpenShift provider. The initial scan may take several hours to complete, depending on the number and size of images. The scan occurs in the OpenShift provider, which ManageIQ receives and records in the database. OpenShift limits the number of scanning pods; only three images can be scanned simultaneously.
Scheduling A Recurring Scan
Software vulnerability databases are updated frequently. To apply these updates, a rescan is required. To schedule a recurring scan of container images:

-
Click Configuration.
-
From Settings > Zones in the left pane of the appliance, select Schedules.
-
From the drop-down menu, click Configuration > Add a new Schedule.
-
Type an arbitrary Name.
-
Type an arbitrary Description.
-
Ensure the Active checkbox is selected.
-
In Action, select Container Image Analysis.
-
In Filter, select All Container Images for Containers Provider, OpenShift.
-
In Run, set the schedule as desired.
-
Set the Time Zone, Starting Date, and Starting Time.
-
Click Add.
Working with Images
Viewing Results
Image scanning results are displayed in each image summary page.
-
Select menu: Compute > Containers > Container Images.
-
Click the desired image.
For an OpenSCAP HTML report, locate the Configuration section and select OpenSCAP HTML.

For compliance and scanning history information, locate the Compliance section and note the Status field or select Available from the History field.

Manual Scanning
SmartState analysis scanning may be initiated manually for images. From an image summary page, select Configuration > Perform SmartState Analysis. Refreshing the image page will reflect the latest scan results and compliance history.
Evaluating Compliance
If the image scan policy has been updated since the last scan, compliance conditions may be re-evaluated. From an image summary page, select Policy > Check Compliance of Last Known Configuration. Refreshing the image page will reflect the latest compliance history.
Generating a Report on Images
You can output the results of an OpenSCAP scan of images to a report for an overview of the security risk level of images. The **Images by Failed OpenSCAP Rule Results are included with ManageIQ and shows whether the image passed or failed OpenSCAP policy criteria, and the security risk.
Note: You can also create a copy of this report and edit it to contain additional information, such as the project name where the image is used to produce more useful results. For more information, see Editing a Report and Reportable Fields in ManageIQ in Monitoring, Alerts, and Reporting for instructions on customizing reports.
Steps to create a report to show image compliance:
-
Browse to menu: Overview > Reports.
-
Click the menu: Reports > All Reports accordion.
-
Browse to menu: Configuration Management > Containers > Images by Failed OpenSCAP Rule Results to run a report that shows which images failed the OpenSCAP compliance.
-
Click
 Queue.
 -
The report generation is placed in the queue and its status shows in the reports page.

-
Click
 (Refresh this page) to update the status.
 -
Browse to the Saved Reports accordion, and click the report when it completes.
-
Click the report download buttons for the type of export you want. The report is automatically named with the type of report and date.
-
Click
 Download this report in text format to download as text.
 -
Click
Download this report in CSV format to download as a comma-separated file. -
Click
 Download this report in PDF format to download as PDF.
-
OpenSCAP Policy Profile
ManageIQ is pre-configured with a default scanning policy profile. This includes conditions to scan and identify compliance, as well as annotate compliance failure. SmartState analysis is performed when new images are added to OpenShift.
Customizing the Scanning Policy Profile
The built-in OpenSCAP policy profile cannot be edited. However, you can assign edited copies of these policies to a new policy profile. This provides you the ability to create a customized version of the built-in OpenSCAP policy profile.
To do so, you must first copy the policy that you want to customize:
-
Browse to menu: Control > Explorer.
-
Click the Policies accordion, select Container Image Compliance Policies, and click OpenSCAP.
-
Click
 Configuration, and an option to copy the policy appears; for example,
 Copy this Container Image Policy.
 -
Click OK to confirm.
The new policy is created with a prefix of Copy of in its description, and it can be viewed in the Policies accordion.
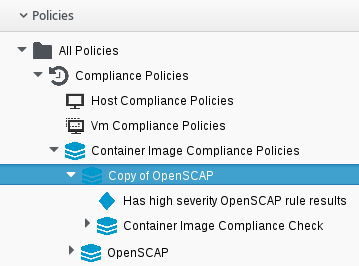
You can now edit the copied policy. After editing copied policies, you can add them to a new policy profile. For instructions on how to edit policies, create a new policy profile, and add policies to it, see the Policies and Profiles guide. Once you have a customized policy profile, you can assign it to a containers provider.
Controlling OpenShift Pod Execution
Through the default policy profile, non-compliant images receive the control policy action Mark as Non-Compliant. This action annotates the image object (not to be confused with the imagestream object) with images.openshift.io/deny-execution=true. This annotation may be used to prevent nodes from running non-compliant images.
Reference
More information about OpenSCAP, see visit the OpenSCAP web site.