- Managing Authentication for CloudForms
- Introduction to Authentication in ManageIQ
- Configuring LDAP Authentication with IdM and Active Directory
- Configuring AWS Identity and Access Management (IAM) Authentication
- Configuring Identity Management (External Authentication) with ManageIQ
- Configuring Authentication with Active Directory
- Configuring Federated Authentication with SAML
- Troubleshooting External Authentication Configuration
Managing Authentication for CloudForms
Introduction to Authentication in ManageIQ
ManageIQ provides several methods to authenticate users. Authentication can be configured from ManageIQ using the local database, or ManageIQ can use protocols such as LDAP and SAML to connect to a pre-configured authentication system such as Red Hat Identity Management (IdM), Red Hat Single Sign-On (SSO), Active Directory (AD), or AWS Identity and Access Management (IAM) to use existing user accounts and groups.
This guide provides instructions to configure authentication management in your ManageIQ environment as an administrative user.
After completing the setup of an authentication system, users can log in with their credentials.
Configuring Authentication Settings in ManageIQ
As the admin user, configure your authentication method from the Authentication tab in the Configuration menu.
To change authentication settings:
-
Click
 (Configuration).
 -
Select your server in the Settings accordion.
-
Select the Authentication tab.
-
Use Session Timeout to set the period of inactivity before a user is logged out of the console.
-
Set the authentication method in Mode from the following methods:
-
To configure authentication locally using the Virtual Management Database (VMDB), choose Database. This is the default method. See Creating a User in General Configuration to create users from ManageIQ.
-
To configure LDAP-based authentication to use with IdM or Active Directory, choose LDAP or LDAPS, see ??? for configuration steps.
-
To configure Amazon AWS Identity and Access Management (IAM) authentication, choose Amazon, see ??? for configuration steps.
-
To configure federated authentication to use with IdM or Red Hat Single Sign-On (SSO), choose External (httpd) and follow the steps for your authentication method in ???.
-
Configuring LDAP Authentication with IdM and Active Directory
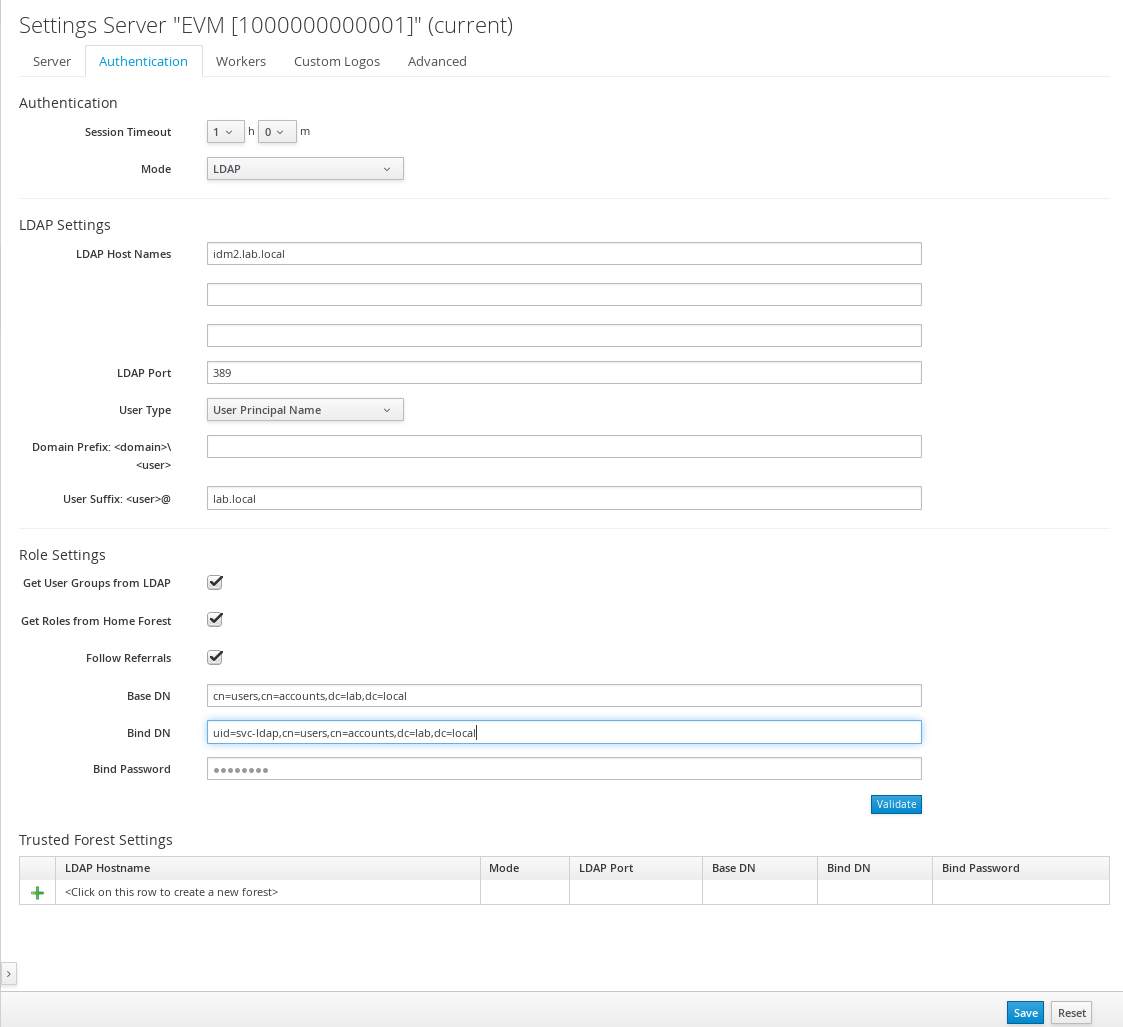
Select LDAP or LDAPS to configure ManageIQ authentication using Red Hat Identity Management (IdM), Active Directory, or another identity management service that uses LDAP protocol.
If you choose LDAP or LDAPS as your authentication mode, the required parameters are exposed under LDAP Settings. Be sure to validate your settings before saving them.
LDAP authentication for ManageIQ requires group membership to be defined by the LDAP RFC 2307 schema, where group members are listed by name in the member UID attribute.
For more information about Red Hat Identity Management, see the Linux Domain Identity, Authentication, and Policy Guide and related Red Hat Enterprise Linux documentation.
Configuring LDAP or LDAPS Authentication
To configure ManageIQ to use LDAP for authentication:
-
Click
(Configuration). -
Select your server in the Settings accordion.
-
Select the Authentication tab.
-
Select a Session Timeout to set the period of inactivity before a user is logged out of the console.
-
Select LDAP or LDAPS from the Mode list. This exposes additional required parameters under LDAP Settings.
-
Configure your LDAP Settings (the following example configures an IdM directory server):
-
Use LDAP Host Names to specify the fully qualified domain names of your directory servers. ManageIQ will search each host name in order until it finds one that authenticates the user. Note, ManageIQ supports using a maximum of three possible LDAP Host Names.
-
Use LDAP Port to specify the port for your directory server. The default is 389 for LDAP and 636 for LDAPS.
-
From the User Type list, select one of the following and configure the values for your directory server:
-
User Principal Name: Type the user name in the format of user@domainname, for example, dbright@acme.com. (In this case, the user would log on as dbright.)
-
Email Address: Logs in with the user’s email address.
-
Distinguished Name (CN=<user>): Uses the common name for the user. Be sure to enter the correct User Suffix and Distinguished Name option for your directory service implementation: for example, cn=dan bright,ou=users,dc=acme,dc=com. (The user logs on as dan bright.)
-
Distinguished Name (UID=<user>): Uses the user ID (UID). Be sure to enter the correct User Suffix and Distinguished Name option for your directory service implementation: for example, uid=dan bright,ou=users,dc=acme,dc=com. (The user logs on as dan bright.)
-
SAM Account Name: User logon for Active Directory clients and servers using legacy Windows versions. You must also configure the Domain Prefix in the next field when selecting this option.
-
-
Specify the Domain Prefix if you are configuring an Active Directory LDAP host, and selected SAM Account Name as the User Type. This field represents the prefix name in the Active Directory domain. Together with the SAM account name, this constructs the fully qualified user name in the format
<domain_prefix>\<user>. -
Specify the User Suffix, such as acme.com for User Principal Name or cn=users,dc=acme,dc=com for Distinguished Name, in Base DN.
The `ldapsearch(1)` command can be used to get details of your LDAP settings. To get details related to a specific user, run: # ldapsearch -D "cn=directory manager" -H ldap://www.acme.com:389 -b "dc=acme,dc=com" -s sub "(objectclass=*)" -w password | grep -i dbright To search for your directory server’s distinguished name (DN) values, run: # ldapsearch -D "cn=directory manager" -H ldap://www.acme.com:389 -b "dc=acme,dc=com" -s sub "(objectclass=*)" -w passwordExample: LDAP Configuration.
-
-
Configure your Role Settings: In both LDAP and LDAPS, you can use groups from your directory service to set the role for the authenticated LDAP user. The LDAP user must be assigned one of the account role groups. See Assigning ManageIQ Account Roles Using LDAP Groups for more information.
-
For LDAP users not belonging to a group:
- Select a ManageIQ group from the Default Group for Users list. This default group can be used for all LDAP users who use LDAP for authentication only. Do not select Get User Groups from LDAP, which will hide the Default Group for Users option.
-
For LDAP users belonging to a group:
-
Select Get User Groups from LDAP to retrieve the user’s group membership from LDAP. This looks up all groups in the directory server for the user attempting to log in. This group list is matched against the available groups configured in ManageIQ. Once a match is found, the role associated with the matching group identifies the authority the user will have on ManageIQ. This requires group names on the directory server to match ManageIQ group names. Selecting this box enables user records to be automatically created in ManageIQ when a user logs in.
If you do not select **Get User Groups from LDAP**, the user must be defined in the VMDB where the User ID is the same as the user’s name in your directory service typed in lowercase. See [Creating a User](https://access.redhat.com/documentation/en-us/red_hat_cloudforms/4.7/html-single/general_configuration/#creating_a_user) in *General Configuration* for steps on creating users.If your LDAP directory uses the `groupMembership` attribute to contain a user’s group membership, you can use a multi-value attribute to look up a user’s groups in ManageIQ. This is not the default ManageIQ behaviour, and must be enabled manually in the advanced settings. After configuring your LDAP settings, update the default ManageIQ LDAP configuration to support `groupMembership` in menu:Configuration\[Settings \> Advanced\] by changing `group_attribute: memberof` to `:group_attribute: groupmembership`. -
Select Get Groups from Home Forest to use the LDAP groups from the LDAP user’s home forest. This will allow you to discover groups on your directory server and create ManageIQ groups based on your directory server’s group names. Any user logging in will be assigned to that group. This option is only displayed when Get User Groups from LDAP is selected.
In most environments, it is recommended to select both the **Get User Groups from LDAP** and **Get Groups from Home Forest** options. -
Select Follow Referrals to look up and bind a user that exists in a domain other than the one configured in the LDAP authentication settings.
-
Specify the user name to bind to the directory server in Bind DN. This user must have read access to all users and groups that will be used for ManageIQ authentication and role assignment, for example, a service account user with access to all LDAP users (named svc-ldap in this example).
-
Enter the password for the Bind DN user in Bind Password.
-
-
-
Click Validate to verify your settings.
-
Click Save.
LDAP authentication is now configured in your ManageIQ environment.
To use a multi-value attribute to look up LDAP group membership, update
the group_attribute field in the ManageIQ advanced
settings. In menu:Configuration[Settings > Advanced], change
group_attribute: memberof to :group_attribute: groupmembership.
To assign account roles using LDAP groups, see Assigning ManageIQ Account Roles Using LDAP Groups.
Adding Trusted Forests
Optionally, if a user has group memberships in another LDAP forest, specify the settings to access the memberships in the trusted forest.
When trusted forests are added to the authentication configuration, they are used only for finding groups that a user is a member of. ManageIQ will first collect all of the user’s groups from the primary LDAP directory. Then it will collect any additional groups that the user is a member of from all of the configured forests.
The collected LDAP groups are used to match, by name, against the groups defined in ManageIQ. The user must be a member of at least one matching LDAP group to be successfully authenticated.
To add another trusted forest:
-
Click
(Configuration). -
Select your server in the Settings accordion.
-
Select the Authentication tab.
-
Select Get User Groups from LDAP, and enter all items in the Role Settings area.
-
In the Trusted Forest Settings area, click
 (Click to add a new forest).
 -
Enter the LDAP Host Name, select a Mode, and enter an LDAP Port, Base DN, Bind DN, and Bind Password.
-
Click Save.
After adding other trusted LDAP forests, you can then change the order in which ManageIQ looks up the forests for authentication. For instructions, see Configuring Lookup Priority for LDAP Groups.
Assigning ManageIQ Account Roles Using LDAP Groups
After configuring LDAP authentication as described in Configuring LDAP Authentication with IdM and Active Directory, you can associate ManageIQ account roles with your LDAP users. The LDAP directory server defines the groups and users for ManageIQ, while ManageIQ defines the account roles, and maps the roles to the privileges the LDAP user has.
There are two ways to associate your LDAP groups with ManageIQ account roles:
-
Create groups in ManageIQ that match your existing LDAP groups by name, and assign the groups account roles; or
-
Create groups on your directory server based on the default account roles in ManageIQ.
The users in your LDAP groups then inherit the ManageIQ account roles for the LDAP group(s) they are in.
The authentication process then happens as such:
-
LDAPuser1 attempts to log into ManageIQ, so ManageIQ queries the directory server to verify it knows LDAPuser1.
-
The directory server then confirms that it knows LDAPuser1, and provides information about the LDAP groups LDAPuser1 belongs to: Group1.
-
ManageIQ then looks up Group1, and discovers that Group1 is associated with Role1.
-
ManageIQ then associates LDAPuser1 with Group1 in ManageIQ, and then allows the user to perform tasks allowable by that role.
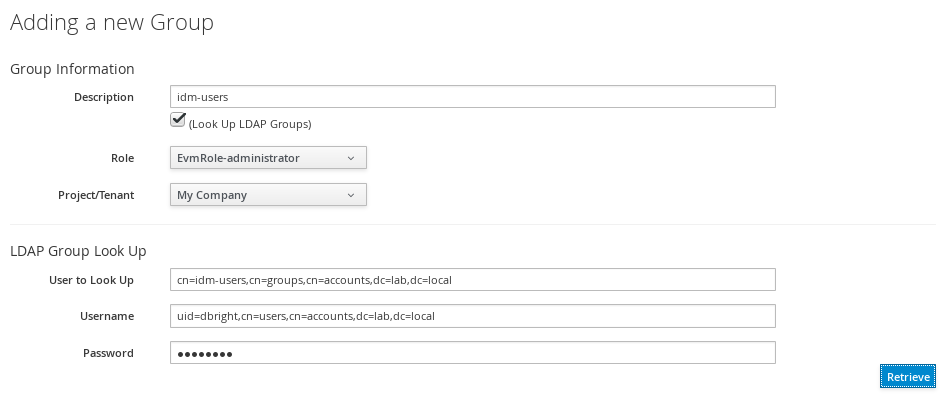
Mapping Existing LDAP Groups to ManageIQ User Account Roles
This section provides instructions for mapping your existing LDAP groups to account roles in ManageIQ. As a result, the users in the LDAP group will then be assigned to the ManageIQ roles associated with that group.
-
Click
(Configuration). -
Click the Access Control accordion, then click Groups.
-
Click
 (Configuration), and
  (Add a new Group) to create a
group.
(Add a new Group) to create a
group. -
There are two ways to specify the group to use:
-
In the Description field, enter the common name (cn) for your existing LDAP group assigned to users requiring access to ManageIQ.
-
Select Look Up LDAP Groups to find a list of groups assigned to a specific user in LDAP, then use the LDAP Group for User list to choose a group.
-
In User to Look Up, enter the common name (cn) for a user in your LDAP group.
-
Enter the Username.
-
In Password, enter the user’s password. Click Retrieve.
-
-
-
Select a Role to map to the group.
-
Select a Project/Tenant to map to the group.
-
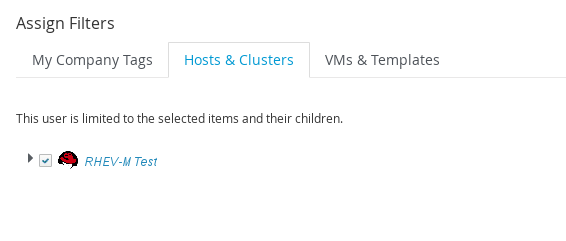
Select any filters to apply to what this group can view in the Assign Filters area:
-
In the My Company Tags tab, select tags to limit the user to items containing those tags. The items that have changed show in a blue italicized font.
-
In the Host & Clusters tab, select the host and clusters to limit the user to. The items that have changed show in a blue italicized font.
-
In the VMs & Templates tab, select the folders created in your virtual infrastructure to limit the user to. The items that have changed show in a blue italicized font.
-
-
Click Add.
To configure the LDAP group lookup priority, see Configuring Lookup Priority for LDAP Groups.
Creating LDAP Groups Based on ManageIQ Account Roles
You can also configure access control for LDAP users by creating groups on your directory server based on ManageIQ user account roles.
Your LDAP group names must match the account role names in ManageIQ. The LDAP users in that group are then automatically assigned to that specific account role.
In your LDAP directory service:
-
Define a distribution group for one or more of the account roles with the names shown in the table below. This group must be in the LDAP directory source you specified for the server. See Configuring LDAP Authentication with IdM and Active Directory.
Directory Service Distribution Group Name Account Role EvmGroup-administrator Administrator EvmGroup-approver Approver EvmGroup-auditor Auditor EvmGroup-consumption_administrator Consumption Administrator EvmGroup-container_administrator Container Administrator EvmGroup-container_operator Container Operator EvmGroup-desktop Desktop EvmGroup-operator Operator EvmGroup-security Security EvmGroup-super_administrator Super Administrator EvmGroup-support Support EvmRole-tenant_administrator Tenant Administrator EvmRole-tenant_quota_administrator Tenant Quota Administrator EvmGroup-user User EvmGroup-user_limited_self_service User Limited Self Service EvmGroup-user_self_service User Self Service EvmGroup-vm_user VM User Account Role and Directory Service Group Names
-
Assign each user of your directory service that you want to have access to ManageIQ membership to one of these groups.
On your ManageIQ appliance:
-
Click
(Configuration). -
Click the Settings accordion, then select your server under Zones.
-
Click the Authentication tab and enable Get User Groups from LDAP after typing in all of the required LDAP authentication settings. See Configuring LDAP Authentication with IdM and Active Directory.
Configuring Lookup Priority for LDAP Groups
ManageIQ can have multiple LDAP groups configured, which the appliance will attempt to authenticate with one by one until it succeeds. The lookup priority of these groups can be rearranged.
To configure the order in which ManageIQ looks up LDAP groups:
-
Click
(Configuration). -
Click on the Access Control accordion, then click Groups.
-
Click
(Configuration), and (Edit Sequence of User Groups for
LDAP Look Up) to prioritize which group a user will default to if
LDAP returns multiple matching groups. -
Select one or more consecutive groups and use the arrow buttons to move the user group higher or lower in priority.
-
Click Save.
Testing LDAP Configuration
To test that your LDAP or LDAPS group configuration is working correctly with ManageIQ:
-
Log out of the ManageIQ user interface.
-
Log back in as an LDAP user that is assigned to one or more of the matching groups.
-
Change groups by clicking on the user dropdown menu on the top right of the user interface. The dropdown list will show the groups the user is authorized for.
You can also check the logs in /var/www/miq/vmdb/log/audit.log or
/var/www/miq/vmdb/log/evm.log to verify your LDAP configuration is
working correctly with the following steps:
-
Run the following command in a terminal to view the log messages in real time:
$ tail -f /var/www/miq/vmdb/log/audit.log -
Log into the ManageIQ user interface as an LDAP user, while checking
/var/www/miq/vmdb/log/audit.logfor updated status, success, or failure messages. Alternatively, you can test your LDAP configuration by viewing the logs in/var/www/miq/vmdb/log/evm.logwithgrep, which are more verbose.
Troubleshooting LDAP Configuration
To test a problematic ManageIQ LDAP configuration, run the following command to see if the user been pulled from LDAP with the right group. For example:
# ldapsearch -x -H ldap://ldap-example:389 -LLL \ -b "ou=people,dc=example,dc=com" -s sub \ -D "ui=:userid,ou=People,dc=example,dc=com" -w :password \ "(objectclass=organizationalPerson)
To test if the user belongs to right group, include one of the following
lines in the ldapsearch command above:
(&(objectClass=user)(sAMAccountName=yourUserName) (memberof=CN=YourGroup,OU=Users,DC=YourDomain,DC=com))
or
-b "ou=groups, dc=example,dc=com"
Configuring AWS Identity and Access Management (IAM) Authentication
If you choose Amazon AWS Identity and Access Management (IAM) as your authentication mode, required parameters are exposed under Amazon Primary AWS Account Settings for IAM (Identity and Access Management). Be sure to validate your settings before saving them.
To configure ManageIQ to use AWS IAM authentication:
-
Click
(Configuration). -
Select your server in the Settings accordion.
-
Select the Authentication tab.
-
Use Session Timeout to set the period of inactivity before a user is logged out of the console.
-
Select Amazon as the authentication method in the Mode list.
-
Type in an Access Key provided by your Amazon account.
-
Type in a Secret Key provided by your Amazon account.
-
Optionally, select Get User Groups from Amazon to retrieve the user’s group membership from Amazon. This is used for mapping a user’s authorization to a ManageIQ role.
-
Click Validate to verify your settings.
-
Click Save.
Users logging into ManageIQ with Amazon authentication enter their own IAM access key as the username and IAM secret access key as the password.
Amazon users must be added as a ManageIQ user or belong to an IAM user group added to the list of ManageIQ groups.
Configuring Identity Management (External Authentication) with ManageIQ
You can configure ManageIQ to use system authentication methods such as Red Hat Identity Management (IdM) or IPA, Red Hat Single Sign-On (SSO), or Active Directory (AD).
This method uses apache (httpd) modules with web browsers to control
authentication to ManageIQ. It is the recommended
authentication method to connect ManageIQ with most
identity management services.
Configuring Authentication with IPA
You can configure ManageIQ to use IPA with the External Authentication (httpd) option in ManageIQ.
When external authentication is enabled, users can log in to the ManageIQ appliance using their IPA server credentials. The appliance creates user accounts automatically and imports relevant information from the IPA server.
The appliance contains IPA client software for connecting to IPA servers, but it is not configured by default. External authentication is enabled by configuring it with the appliance console and enabling it the web interface.
Disabling external authentication and returning to internal database authentication also requires steps in both the appliance console and the web user interface.
External Authentication Requirements
-
For an appliance to leverage an IPA server on the network, both the appliance and the IPA server must have their clocks synchronized or Kerberos and LDAP authentication fail.
-
The IPA server must be known by DNS and accessible by name. If DNS is not configured accordingly, the hosts files need to be updated to reflect both IPA server and the appliance on both virtual machines.
-
For users to log in to the appliance using IPA server credentials, they must be members of at least one group on the IPA server which is also defined in the appliance. Navigate to the settings menu, then menu:Configuration[Access Control > Groups] to administer groups.
Configuring the Appliance for External Authentication
To configure the appliance for external authentication, set up authentication using the appliance console, then select the External Authentication option in the web user interface.
Using the appliance console:
-
Log in to the appliance console using the user name
admin. -
The summary screen displays:
External Auth: not configured -
Press Enter.
-
Select Configure External Authentication (httpd).
-
Enter the fully qualified host name of the IPA server, for example ipaserver.test.company.com.
-
Enter the IPA server domain, for example test.company.com.
-
Enter the IPA server realm, for example TEST.COMPANY.COM.
-
Enter the IPA server principal, for example admin.
-
Enter the password of the IPA server principal.
-
Enter
yto proceed.
Alternatively, you can configure external authentication using the
appliance_console_cli command instead of using the appliance console
menu:
$ ssh root@appliance.test.company.com
[appliance]# /bin/appliance_console_cli --host appliance.test.company.com \
                                      --ipaserver ipaserver.test.company.com \
                                      --iparealm TEST.COMPANY.COM \
                                      --ipaprincipal admin \
                                      --ipapassword smartvm1
Finish configuring external authentication using the web user interface:
-
Log in to the web user interface as an administrative user.
-
Navigate to the settings menu, then menu:Configuration[Settings > Zone > Server > NTP Servers] or use the hosting provider of the virtual machine to synchronize the appliance’s time with an NTP server.
-
Click
(Configuration). -
Select your server in the Settings accordion.
-
Select the Authentication tab.
-
Select a Session Timeout if required.
-
Select External (httpd) in the Mode list.
-
Select Enable Single Sign-On to allow single sign-on using Kerberos tickets from client machines that authenticate to the same IPA server as the appliance.
-
In the Role Settings area, select Get User Groups from External Authentication (https).
-
Click Save.
Reverting to Internal Database Authentication
To revert to internal database authentication, first configure authentication using the web user interface, then using the appliance console.
Using the web user interface:
-
Click
(Configuration). -
Select your server in the Settings accordion.
-
Select the Authentication tab.
-
Select Database in the Mode list.
-
Click Save.
Using the appliance console:
-
Log in to the appliance console using the user name
admin. -
The summary screen displays:
External Auth: Id.server.FQDN -
Press
Enter. -
Select Configure External Authentication (httpd). The currently configured IPA server host name and domain are displayed.
-
Enter
yto remove configuration details for the IPA client.
$ ssh root@appliance.test.company.com
[appliance]# /bin/appliance_console_cli --uninstall-ipa
Optional Configuration Using the Appliance Console CLI
In addition to using the appliance console, external authentication can optionally be configured and reverted using the appliance console command line interface.
Appliance console CLI command and relevant options include:
/bin/appliance_console_cli --host <appliance_fqdn>
                           --ipaserver <ipa_server_fqdn>
                           --iparealm <realm_of_ipa_server>
                           --ipaprincipal <ipa_server_principal>
                           --ipapassword <ipa_server_password>
                           --uninstall-ipa4.5
-
--host Updates the host name of the appliance. If you performed this step using the console and made the necessary updates made to
/etc/hostsif DNS is not properly configured, you can omit the--hostoption. -
--iparealm If omitted, the
iparealmis based on the domain name of theipaserver. -
--ipaprincipal If omitted, defaults to admin.
Configuring Authentication with Active Directory
This procedure outlines how to configure ManageIQ to authenticate against an existing Active Directory (AD) configuration using external HTTP authentication. This provides Active Directory users access to the ManageIQ appliance user interface, as well as the REST API.
Connecting ManageIQ to an Active Directory Domain
To use an Active Directory domain to authenticate users to ManageIQ, configure the following on ManageIQ:
-
Connect to the ManageIQ appliance using SSH.
-
Run
realm discoverto determine what Active Directory realms are available:# realm discover example.com type: kerberos realm-name: EXAMPLE.COM domain-name: example.com configured: kerberos-member server-software: active-directory client-software: sssd required-package: oddjob required-package: oddjob-mkhomedir required-package: sssd required-package: adcli required-package: samba-common login-formats: %U@example.com login-policy: allow-realm-logins -
Using the above information for your realm, join the Active Directory realm with a user that has enough permissions to be able to browse the directory:
# realm join example.com -U user Password for user: ****** -
Allow all realm users to log in using
realm permit:# realm permit --all -
Edit the
/etc/sssd/sssd.conffile with your Active Directory domain details. Refer to the following example for formatting:[domain/example.com] ad_domain = example.com krb5_realm = EXAMPLE.COM realmd_tags = manages-system joined-with-samba cache_credentials = True id_provider = ad krb5_store_password_if_offline = True default_shell = /bin/bash ldap_id_mapping = True use_fully_qualified_names = True fallback_homedir = /home/%d/%u access_provider = ad ldap_user_extra_attrs = mail, givenname, sn, displayname, domainname [sssd] domains = example.com config_file_version = 2 services = nss, pam, ifp default_domain_suffix = example.com [nss] homedir_substring = /home [pam] default_domain_suffix = example.com [ifp] default_domain_suffix = example.com allowed_uids = apache, root user_attributes = +mail, +givenname, +sn, +displayname, +domainname -
Restart and enable the
sssdservice:# systemctl restart sssd # systemctl enable sssd -
Make sure the Kerberos keytab created by
realm joinabove is readable by Apache:# chgrp apache /etc/krb5.keytab # chmod 640 /etc/krb5.keytab -
Copy the following
httpdconfiguration files into the correct respective directories with the following commands:# TEMPLATE_DIR="/opt/rh/cfme-appliance/TEMPLATE" # cp ${TEMPLATE_DIR}/etc/pam.d/httpd-auth /etc/pam.d/httpd-auth # cp ${TEMPLATE_DIR}/etc/httpd/conf.d/manageiq-remote-user.conf /etc/httpd/conf.d/ # cp ${TEMPLATE_DIR}/etc/httpd/conf.d/manageiq-external-auth.conf.erb /etc/httpd/conf.d/manageiq-external-auth.conf -
Edit the
/etc/httpd/conf.d/manageiq-external-auth.conffile to point to the Kerberos domain hosted by your Active Directory domain by adding or editing the lines forKrbAuthRealms,Krb5KeyTabandKrbServiceNamefor your environment:<Location /dashboard/kerberos_authenticate> AuthType Kerberos AuthName "Kerberos Login" KrbMethodNegotiate On KrbMethodK5Passwd Off KrbAuthRealms example.com Krb5KeyTab /etc/krb5.keytab KrbServiceName Any Require pam-account httpd-auth ErrorDocument 401 /proxy_pages/invalid_sso_credentials.js </Location> -
Set the following SELinux booleans:
# setsebool -P allow_httpd_mod_auth_pam on # setsebool -P httpd_dbus_sssd on -
Restart and enable the
httpdservice:# systemctl restart httpd # systemctl enable httpd
Complete authentication setup by configuring the following on each
appliance with the user_interface or web_services server roles
enabled.
From the ManageIQ user interface:
-
Log in to the user interface as an administrative user.
-
Navigate to the settings menu, then menu:Configuration[Authentication].
-
Select a Session Timeout if required.
-
Select External (httpd) as the authentication Mode.
-
Select Enable Single Sign-On to allow single sign-on using Kerberos tickets from client machines that authenticate to the same Active Directory domain as the appliance.
-
In the Role Settings area, select Get User Groups from External Authentication (httpd).
-
Click Save.
ManageIQ is now configured to use authentication from your Active Directory domain.
Mapping Active Directory Users to ManageIQ User Roles
This section provides instructions for mapping your existing Active Directory (AD) groups to user account roles in ManageIQ.
This is done by assigning a ManageIQ role to an AD group. When an AD user who is a part of that AD group attempts to log in to ManageIQ, they get that role assigned automatically and inherit the permissions from that role. As a result, all users in that AD group will then be assigned the ManageIQ role(s) associated with that group.
After configuring ManageIQ to connect to an Active Directory domain in Connecting ManageIQ to an Active Directory Domain, complete the following steps:
-
Click
(Configuration). -
Click the Access Control accordion, then click Groups.
-
Click
(Configuration), and (Add a new Group) to create a
group. -
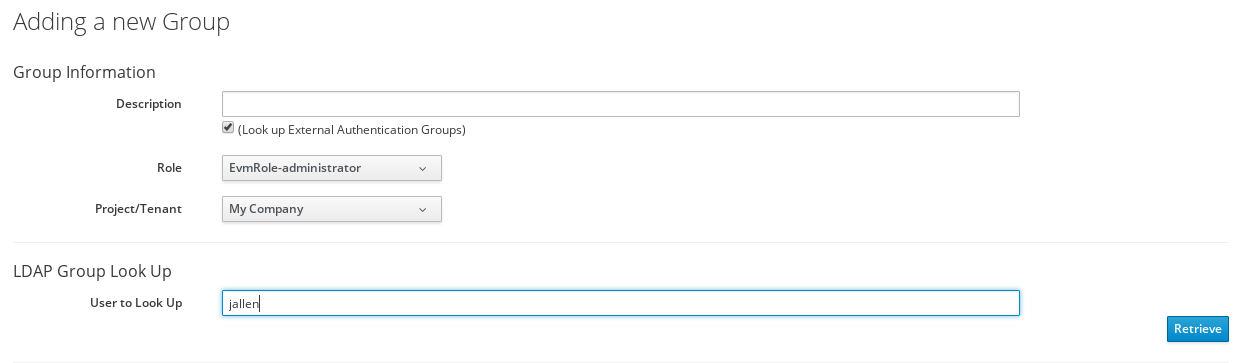
In Group Information, select Look Up External Authentication Groups to find a list of groups assigned to a specific user in Active Directory.
-
In User to Look Up, enter the user name for a user in your AD group.
-
Click Retrieve to look up details for the user in Active Directory and pull group information for the user. As a result, the AD groups will appear in the LDAP Groups for User drop-down list.
-
From the list in LDAP Groups for User, select the group you want to associate a ManageIQ role with; for example, the
cloudformsgroup.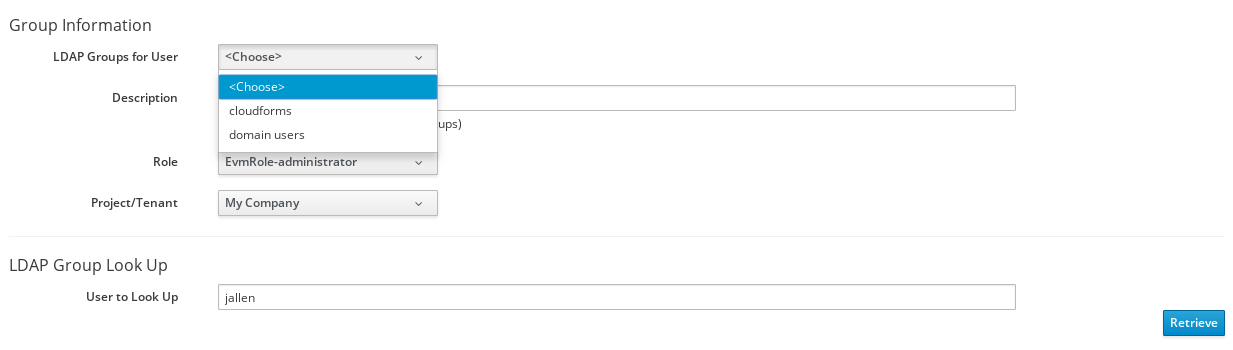
-
Select a Role to map to the group.
-
Select a Project/Tenant to map to the group.
-
Click Add.
Any user who is part of cloudforms AD group can now log in to
ManageIQ with their AD username and password, and they
will automatically inherit the permissions for the role you assigned
earlier.
To confirm this is configured correctly, log in to the
ManageIQ user interface with a user in the cloudforms AD
group.
To grant an additional user access to the ManageIQ server,
create the user in Active Directory, then add that user to the
cloudforms AD group. When that user attempts to log in to
ManageIQ, they will automatically inherit the correct
permissions for the group.
Configuring Federated Authentication with SAML
This procedure outlines how to manually configure an appliance to use SAML for federation authentication.
To enable external authentication using SAML, complete the following steps to configure your HTTP server, then your ManageIQ appliance.
SAML Requirements.
The following is required in order to enable SAML authentication to the appliance:
-
A ManageIQ appliance
-
A SAML identity provider (e.g. Red Hat Single Sign-On 7.0 or later)
Configuring Authentication with SAML and Red Hat Single Sign-On (RH-SSO)
While other SAML identity providers can be used with
ManageIQ, this example procedure covers using Red Hat
Single Sign-On (RH-SSO) 7.0, which is implemented using the Apache HTTP
server’s mod_auth_mellon module.
Configuring the HTTP Server for SAML Authentication with Red Hat Single Sign-On (RH-SSO)
The Apache HTTP server first must be configured to work with SAML
authentication. All SAML-related certificates and keys are accessed from
/etc/httpd/saml2/.
-
Log into the ManageIQ appliance as root using SSH, and create the
/etc/httpd/saml2/directory:# mkdir -p /etc/httpd/saml2 -
Copy the
httpdremote user and SAML template configuration files to the appliance:# TEMPLATE_DIR="/opt/rh/cfme-appliance/TEMPLATE" # cp ${TEMPLATE_DIR}/etc/httpd/conf.d/manageiq-remote-user.conf /etc/httpd/conf.d/ # cp ${TEMPLATE_DIR}/etc/httpd/conf.d/manageiq-external-auth-saml.conf /etc/httpd/conf.d/The following are notable SAML configuration defaults in the `manageiq-external-auth-saml.conf` file: - Identity Provider Files (i.e. Red Hat SSO) - Metadata File: `/etc/httpd/saml2/idp-metadata.xml` - Service Provider Files (i.e. `mod_auth_mellon`) - Private Key File: `/etc/httpd/saml2/miqsp-key.key` - Certificate File: `/etc/httpd/saml2/miqsp-cert.cert` - Metadata File: `/etc/httpd/saml2/miqsp-metadata.xml` Other `mod_auth_mellon` parameters, such as endpoints and protected URLs, must not be modified as the appliance expects them to be defined as such. -
Generate the service provider files on the appliance using the Apache HTTP server’s
mod_auth_melloncommandmellon_create_metadata.sh:# cd /etc/httpd/saml2 # /usr/libexec/mod_auth_mellon/mellon_create_metadata.sh https://<miq-appliance> https://<miq-appliance>/saml2The
mellon_create_metadata.shscript creates file names based on the appliance URL.If your appliance is behind a load balancer or uses a virtual IP address, use the hostname associated with the VIP. For example: `# /usr/libexec/mod_auth_mellon/mellon_create_metadata.sh https://my-haproxy-ka https://my-haproxy-ka/saml2` -
Rename the files created by the
mellon_create_metadata.shscript to match the expected file names from themanageiq-external-auth-saml.conffile:# mv https_<miq-appliance>.key miqsp-key.key # mv https_<miq-appliance>.cert miqsp-cert.cert # mv https_<miq-appliance>.xml miqsp-metadata.xml -
Now that the service provider’s
metadata.xmlfile has been generated, the service provider definition can be defined in the SAML identity provider. For Red Hat SSO, a realm can be created for one or more appliances with individual clients defined one per appliance, where the client ID is specified as the URL of the appliance.To add a client in the Red Hat SSO ManageIQ realm:
-
Select and import the
miqsp-metadata.xmlfile created formod_auth_mellon. -
Set the client ID as
https://<miq-appliance>. -
Set the client protocol as
saml.
-
-
Update the client definition for the appliance in Red Hat SSO with the following:
Setting Value Name ID Format username Valid Redirect URIs https://<miq-appliance/saml2/postResponse> Assertion Consumer Service POST Binding URL https://<miq-appliance/saml2/postResponse> Logout Service Redirect Binding URL https://<miq-appliance/saml2/logout> -
Obtain the identity provider’s
idp-metadata.xmlmetadata file as follows:# cd /etc/httpd/saml2 # curl -s -o idp-metadata.xml \ http://<redhatSSO-server>:8080/auth/realms/<miq-realm>/protocol/saml/descriptor -
In ManageIQ, the following change is necessary to the
idp-metadata.xmlfile for SAML logout to work betweenmod_auth_mellonand Red Hat SSO:# vi idp-metadata.xml ... <SingleLogoutService < Binding="urn:oasis:names:tc:SAML:2.0:bindings:HTTP-POST" --- > Binding="urn:oasis:names:tc:SAML:2.0:bindings:HTTP-Redirect" Location= ... -
Restart the HTTP server on the appliance:
# systemctl restart httpd
Configuring SAML Authentication in the ManageIQ User Interface
After configuring the HTTP server for SAML, update the ManageIQ appliance so that user interface can be accessed using SAML authentication.
-
Click
(Configuration). -
Select your server in the Settings accordion.
-
Select the Authentication tab.
-
Select a Session Timeout to set the period of inactivity before a user is logged out of the console.
-
Set the mode to External (httpd).
-
Check Enable SAML. This enables the SAML login button on the appliance login screen, then redirects to the SAML protected page for authentication, and supports the SAML logout process.
-
Check Enable Single Sign-On. With this option enabled, initial access to the appliance’s user interface redirects to the SAML identity provider authentication screen. Logging out from the appliance returns the user to the appliance login screen, allowing them to log in as
adminunless Disable Local Login is also checked. -
Optional: Check Disable Local Login to disable the
adminlogin to appliance and only allow SAML based authentication. Note that if there are issues with the identity provider or you requireadminaccess to the appliance, you cannot log in through the appliance login screen until you re-enable local login as described in Re-enabling Local Login . -
Check Get User Groups from External Authentication (httpd).
-
Click Save.
Complete the above steps on each appliance in the settings menu, then navigate to menu:Configuration[Access Control].
You can now log into your ManageIQ appliance using your SAML credentials.
SAML Assertions
To authenticate to the ManageIQ appliance using SAML, the following remote user parameters are looked at by the appliance upon a successful login and redirect from the identity provider. These parameters are used by the appliance to obtain group authentication information.
| HTTP Environment | SAML Assertion |
|---|---|
| REMOTE_USER | username |
| REMOTE_USER_EMAIL | |
| REMOTE_USER_FIRSTNAME | firstname |
| REMOTE_USER_LASTNAME | lastname |
| REMOTE_USER_FULLNAME | fullname |
| REMOTE_USER_GROUPS | groups |
For Red Hat SSO, the above SAML assertions can be defined for the appliance client in Red Hat SSO as mappers.
| Name | Category | Type | Property |
|---|---|---|---|
| username | AttributeStatement Mapper | User Property | username |
| AttributeStatement Mapper | User Property | ||
| firstname | AttributeStatement Mapper | User Property | firstName |
| lastname | AttributeStatement Mapper | User Property | lastName |
| fullname | AttributeStatement Mapper | User Attribute | fullName |
| groups | Group Mapper | Group List | groups |
Re-enabling Local Login (Optional)
If you disabled local login in the ManageIQ user interface
but need the ability to log in as admin, you can re-enable local login
using one of the following methods:
Re-enabling Local Login from the Appliance User Interface.
This method requires the identity provider to be available, and the ability to log in as a user with enough administrative privileges to update ManageIQ authentication settings.
-
Log in to the appliance user interface as the administrative user.
-
From the settings menu, select menu:Configuration[Authentication].
-
Uncheck Disable Local Login.
-
Click Save.
-
Use SSH to log into the appliance as
root. -
Run the
appliance_consolecommand. -
Select Update External Authentication Options.
-
Select Enable Local Login.
-
Apply the updates.
Alternatively, log into the appliance as root using SSH, and run the following command:
# appliance_console_cli --extauth-opts local_login_disabled=false
Troubleshooting External Authentication Configuration
The following are common errors that you may encounter when integrating with IPA:
Error -1 : Kerberos authentication failed: kinit: Cannot contact any KDC for realm
Resolution: Verify on IPA server if you are able to log into the IPA server using same user.
Error-2: [----] W, [2017-09-28T10:05:29.157980 #28902:fa8bc4] WARN -- Failure: MIQ(Authenticator.authenticate) userid: [jdoe] - Authentication failed for userid jdoe: Authentication token is no longer valid; new one required
Resolution: The password has expired. Go to IPA/LDAP server and
update your password using kinit <username>.
Error-3: [----] W, [2017-09-28T10:13:10.083614 #28902:fa8bc4] WARN -- Failure: MIQ(Authenticator.block in authorize) userid: [jdoe] - Authentication failed for userid jdoe, unable to match user's group membership to an EVM role
Resolution: You should add the same group to the ManageIQ group. Make sure you select Look up External Authentication Groups and enter the group name and user to look up.
Additional Troubleshooting Tips
-
Make an IPA/LDAP host entry in
/etc/hostsfile on the ManageIQ appliance. -
Make sure NTP synchronization exists between the ManageIQ appliance and the IPA server.
-
Check
/var/log/krb5kdc.logon the IPA server end and/var/www/miq/vmdb/log/audit.logon the ManageIQ appliance end for any other exception.